-
 info@buildanyhomes.com
 -
 +91-7972821404
+91-8530075659
- Home Design and Approval - 3%
- Excavation - 3%
- Footing and Foundation - 12%
- RCC Work - Columns, beam - 10%
- Roof Slab - 13%
- Brickwork and Plastering - 17%
- Flooring and Tiling - 10%
- Electric Wiring - 8%
- Water Supply and Plumbing - 5%
- Doors and Windows - 8%
- Painting - 6%
- Furnishing - 5%

YOUR BUDGET AND OUR EXPERIENCE COLLABS HERE TO GIVE YOU THE BEST RESIDENTIAL DESIGNS
Construction Estimate
The construction building estimate for any building is directly proportional to the design, material specification, and logistics movement (plot location).
Where ever if we check minutely then there are many factors which involve in your building estimate i.e Design given by the consultant, Material Specification, Plot location, etc. Any type of design that going to be executed on the site shall always need to have the material specification and its quantity, moreover, the execution is also the most important factor, that the contractor hired for construction have well-equipped machinery and qualified manpower because the wastage % should not increase this is the most important aspect which can be controlled by us and our professional due to which we can control your construction budget as per the given budget by engineer or consultant.
10 reasons why you need to hire professional contractor
for building your dream home
1. Professional Competency in Home Construction
Putting up a good home requires good knowledge and understanding of engineering and construction. Professional experts of BUILD ANY HOMES in the field of home construction are well trained, experienced and schooled. Therefore, they have comprehensive knowledge of the various aspects involved in the home construction. You can be sure that, by hiring them, you will get value from their services, including ensuring that your dream home is structurally sound and at affordable cost as well.
2. Actualize Your Dream Home
Sometimes, you may have an idea of a home that you want to build and the features that you want to taken-up in the house. If you don’t have any idea about your home BUILD ANY HOMES have millions of ideas which can be best fit to your land and home. Transforming this mental image into an actual building requires a professional contractor who having knowledge of the entire area of home construction and building. Our professionals can incorporate every aspect that you desire in your dream house.


3. Receive Comprehensive Services
The BUILD ANY HOMES structured their services to ensure that their customers receive wholesome and comprehensive services. From the moment you approach the company with your ideas and ambitions, the company will endeavour to take up the entire project and construct the house from start to finish. Hiring such a professional that offers comprehensive services gives you the PEACE OF MIND.
4. Benefits from Technical Knowledge
The entire concept of putting up a building from start to finish requires technical knowledge in multiple disciplines. Some of the challenges that may arise during the home construction process get to be amicably resolved from the technical knowledge that the BUILD ANY HOMES has. For instance, the engineers and constructors have technical skills on issues such as resolving a crack on one of the walls without necessarily tearing down the entire house to build it afresh. The engineers can also come up with solutions such as how to put up a sewage system that will last for a lifetime.
5. Accurate Costing and Value for Money
The BUILD ANY HOMES has developed a system that you can get any or all the services under one roof. Once you finalised design, we will give exact estimate of your dream house, no extra or hidden charges will be there. The amount you are charged is also negotiable to ensure that it fits within your budget. When you hire BUILD ANY HOMES for your home construction, you will undoubtedly receive value for your money as compared to working with other companies that do not have the necessary technical experience in the field of home construction.
6. Receive Speedy Delivery
No one appreciates the idea of having a house that unnecessarily takes long time to complete and launch. The BUILD ANY HOMES will ensure that you have your home completed within a short duration of time. We have the necessary equipment and workforce required to complete the task within your desired timeline.


7. Save on Budget
A home construction project can be quite expensive; to the tune of millions of rupees depending on the scale of the project. Our professional will offer various tips on how to cut on construction costs when building your home. The company have advance technologies that can help achieve your home ownership dream within a budgeted amount. Building a home that is energy-efficient, with low maintenance and which allows in as much natural light as possible, thereby reducing on energy requirements for the house.
8. Receive Necessary Guarantees
Our experts in home construction are so professional that they can give you a guarantee of the kind of services they render during the home construction process. For instance, experts guarantee that your house will be able to withstand natural calamities and disasters, such as flooding and earthquakes up to a certain level.
9. Have Peace of Mind
Investing the entire home construction project into the hands of a single individual contractor is much better than having the hassle of thinking and juggling the intensive work involved in building a home. Persons who aspire to manage their own home construction processes normally go through a lot in terms of the volume of work required and the number of activities to balance in terms of paperwork and the groundwork.
10. Accountability and Transparency
BUILD ANY HOMES care much about their reputation. Therefore, highly unlikely to fleece you or even worse, embezzle your funds in any way. The company you hire will endeavour to ensure that it's reputation is intact at the end of the project. Some of the added benefits that you may receive, in this regard, include accountability and transparency in every aspect of the entire project. For instance, the company will ensure that sufficient communication is issued to you promptly enough while also handling you in a customer-friendly manner. Such benefits are only enjoyed when you hire a professional contractor company to build your dream home.
Frequently
- How to Plan Your Home's Layout?
A good home layout plan can be assessed based on the number of rooms, proper ventilation, and draining system, convenient storage space, and adequate outdoor space. In architecture and building engineering, a floor plan is a scaled diagram of a room or building viewed from above. Floor plans or house building plans play an important role when designing or building a home. Floor plans illustrate the location of walls, windows, doors, as well as fixed installations such as bathroom fixtures, and kitchen cabinetry. There are few important pointers you need to check while planning your homes layout such as,
- Soil quality test
- Evenness of the land (Ground level)
- Vaastu (If you believe in it)
- Weather
- Neighbouring homes condition
- How To Test a Brick?
The entire house is made of bricks, so choosing the right brick is important. Today we will see how to choose the right brick.
- First test, when two bricks collide, a metallic sound should be made.
- Secondly, if you drop it from a height of four feet, the brick should not break.
- Third test, bricks should be the same on all sides. That is, it's edges should be straight and there should be no cracks in it.
- And the fourth test, when it is immersed in water, it's weight should not increase by more than 15 percent. So now you have to choose the right brick.
- How to select the right plot?
-
- The plot you choose for construction should be well-connected to roads.
- It should have the provision for basic utilities water and electricity.
- The plot should be away from the traffic, noise, and pollution.
- Make sure your plot is close to hospitals, schools, and public transport.
- The plot should not be prone to earthquakes and flooding.
- There should not be any encroachment or any kind of litigation on the plot.
- These are the few things to watch out for while choosing the plot for construction.
- How to select steel?
Selecting the right steel for your home.
- Check the diameter of the rod, ISI mark, grade, and weight.
- Always buy the steel or TMT bars from a well-reputed brand.
- When you bend the steel rod, it should not show cracks on the surface.
- The TMT bar should be free from rust and loose dust, and it's ribs should be intact.
- Never store steel or TMT bars on the ground as the humidity from the ground can result in rust.
- Anti-termite treatment?
-
- A chemical coating is applied to your foundation, pillars and flooring.
- It’s important to treat your home before completing construction.
- Because it takes less chemical and effort during this stage
- It also helps eradicate the termite problem completely
- How to supervise foundation work?
-
- It’s dangerous to build the foundation on soft soil.
- So, make sure the workers continue digging till they find hard rock.
- It’s important to check the alignment and when you’re filling the concrete, the bars shouldn’t move.
- The concrete should be used in the foundation immediately after it’s mixed.
- Once’s the pillars are built, be sure to cure them with water.
- Yours foundation’s depth and breadth depend on the soil and the structure built by you.
- Consult an experienced engineer if you need any help and before you start any construction work, remember to carry out anti-termite test.
- Legal documents to check/verified before buying plot
-
Here are a few important things to keep in mind when you buy a plot.
- Before buying a plot, remember to check that the plot isn't disputed.
- Avoid buying a plot in legal disputes - Before buying a plot, remember to check that the plot isn't disputed.
- Check the original documents - If the original documents for the plot are missing, it could be because of a mortgage.
- Check the deed - Always check if the person selling the house has the authority to sell the house or not.
- Survey surveyor - Ensure that you get certified surveyor to mark the boundaries of the plot.
- Common home building mistakes
-
Here are list of avoid home building mistake
- Always consult with an engineer and architect - It is a good idea to involve an expert and experienced engineer and architect to plan your new home construction.
- Select your contractor carefully - Always select the best contractor with years of experience and expertise.
- Understand your family's needs - Talk to your family and understand the needs of each member before you start the home construction planning.
- Discuss with your neighbours - It is also wise to discuss with your neighbours about what is right and what will work.
- Get a No Objection Certificate - The worst thing when building a new home is to get yourself into legal mess. Always check all the legal documents and obtain NOC before you start any kind of construction work.
- Plan for your budget - Planning for the budget before hand is the one of the most essential parts of home building.
- Never compromise on quality - Always choose the best quality building materials. Go with the well-reputed brand in the market.
- Wall plastering work
-
some wall plastering work tips & techniques you need to take care of
- Before you apply plaster ensure that the walls have some moisture. This will stop the walls from absorbing the water in the plaster.
- When you are planning to do plastering ensure that you mix in small amounts as this allows the plaster to be used immediately.
- If the surface of the walls is not level, apply a thicker coating of plaster.
- After you have applied plaster, it is important to do curing 7-10 days.
- Types of plaster curing
-
- Curing helps maintains the moisture content in the concrete.
- This has the dual advantages of increasing the strength and durability of the concrete.
- Curing should be done when the surface of the structure is hard enough to walk easily.
- To cure slabs, you should make 15mm water ponds on the surface.
- Keep filling water in the ponds and don’t allow water to run dry.
- For curing on beams, walls and columns, you should cove these structures with wet jute bag or wet gunny sacks.
- To maintain moisture, the structure should be watered from time to time.
- Concrete curing should be done when the surface of the structure is hard enough to walk easily.
- Ponding - To cure slabs, you should make 15mm water ponds on the surface. Keep filling water in the ponds and don't allow the water to run dry. This is called ponding.
- Wet curing - For curing on concrete beams, walls, and columns, you should cover the structures with wet jute bags or wet gunny sacks. To maintain moisture, the structure should be watered from time to time. This is called wet curing.
- Safety tips to keep on your mind when doing electrical work
-
Few important electrical safety you must follow when doing the electrical work at home:
- Always seek advice from a registered electrical contractor for all your electrical work at your home.
- Plan your electrical connection spots before carrying out the electrical work.
- It is important that you confirm with your engineer if earthing has been done properly.
- Always purchase electrical materials from a reputed brand and check for ISI tags on each product.
- Make sure there aren't too many joints or connection points in one socket.
- Use fuse for all your electrical appliances.
- Ensure your electrical connections are kept away from water, extreme heat, and kids.
- Do not leave any naked wires. It can be dangerous.
- Rainwater harvesting
-
- Rainwater is use to increase level of ground water.
- To begin work on recharge pit, first you must dig a pit.
- The pit should be 1-2m in breadth and 2-3m in depth.
- Then fill it with stones, coarse aggregates and sand.
- To protect your pit, cover it with a mess and regularly clean the upper surface of the sand.
- This helps the water seep into the ground easily.
- In the areas where the rain water gets collected, you should use the pipe to direct the water to the recharge pit.
- This water can be stored and used for the house work.
- How to save yourself from land litigation?
-
Before choosing a plot always ensure that you ask for all the relevant documents. Do not take a no if the owner refuses to give you all the original documents.
- Ask for a discharge letter in case the documents are with the bank.
- Title deed should have his/her name.
- Take an encumbrance certificate from your sub-register's office.
- Ask for a release certificate if the land has multiple owners.
- Take an opinion from an experienced lawyer.
These are a few tips to save yourself from land litigation.
- How To Choose the Right Construction Team?
-
The key to a successful outcome when you are building your home is choosing the right construction team or company.
- Start by speaking to experienced contractors and masons from the locality.
- Get a better understanding of the materials used, and concerns about the building process.
- Always keep options and ask for references from others in the locality.
- Check out the past work of the construction team you select for building your house.
- Always discuss the final layout and plan with the masons and contractor.
- Take an estimate of construction timeline, materials, labour requirement, and budget estimates.
- Do not forget to get it all documented from the contractor with their contact details.
- Take an opinion from your engineer and architect on the final plan.
- Importance of Backfilling in Construction
-
- Backfilling should be done only after the foundation has been completely set.
- It is done over a 6-inch concrete bed.
- Backfilling should always be done layer by layer and filling shouldn’t be done all at once.
- Make sure that no layer is more than 10 inches in height.
- After every layer, sprinkle water and ram the surface using rammer.
- Which makes the filling hard and it will set well.
- How to Waterproof Your Home?
-
- There should be no defect in the concrete work because if compacting isn’t done right, it may cause water leakage in beams and slabs.
- Plan the slope carefully, make sure the water is flowing in the right direction and doesn’t get accumulated in a place.
- Water can also damage your structure through the ground, that’s why the concrete bed should be damp proofed.
- This gives you house protection against the water entering from the ground.
- How to select cement?
-
The right way to choose cement:
- Always choose a branded cement from a genuine dealer.
- While buying cement remember to look at the manufacturing date.
- Touch the cement bag and ensure that there are no lumps formed inside.
- Cement bag should not be hand stitched.
- Look for the ISI mark on the cement bag.
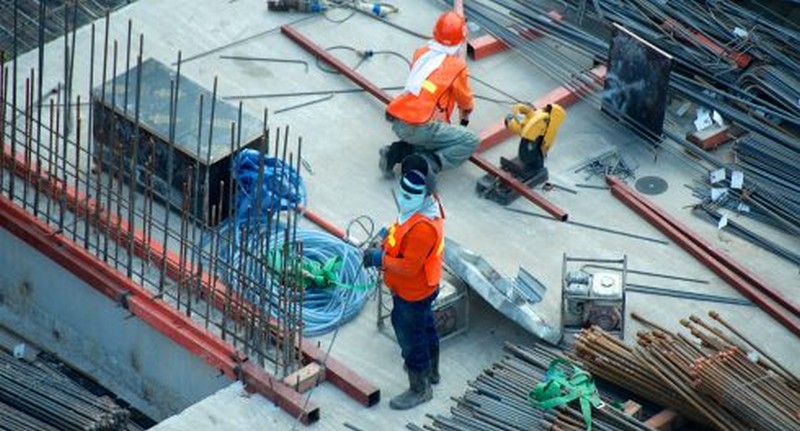
- Construction site safety
-
To ensure a safe construction site –
- It's essential to have a first-aid kit at the construction site.
- Every person at the site should have a safety helmet and boots.
- Ensure that the masons are wearing gloves during work.
- Always keep the helmet tightened.
- Keep the construction site clean and sharp objects should not be lying around the construction site.
- Make sure that the chemical products bear a chemical warning sign.
- Do not leave open live wires on the site.
- It's advised not to get children at the site.
- For safety, Masons working at heights must have their harnesses hooked.
- How to Install Wall Tiles | Wall Tiles Fitting Process | Wall Tiles Fixing
-
few important wall tiles fitting tips that tells how to install wall tiles perfectly:
- For tight grip of a tile, the layer of plaster should be rough.
- Before installing the wall tiles, sprinkle water on the walls cleaning it and then add a thin layer of cement slurry.
- Put the cement paste at the back of the tiles and carefully place them on the wall.
- You can also use ready-made tile adhesives available in the market.
- While fixing tiles, pressure should be light and ensure that the alignment is right.
- After 24 hours apply grout on the tiles joints and keep the tile surface clean.
- How To Do Shuttering the Right Way
-
The shuttering process you need to follow:
- Always use good quality shuttering materials.
- It's thickness should be 3 inches.
- Remember to apply oil or grease to the shuttering before you put the concrete in.
- Always ensure that there are no gaps in the shuttering.
- Remove the shuttering only after the concrete is set completely.
- Shuttering must be kept for at least 16 hours but it is better to keep it for 24 hours.
- Shuttering must be removed carefully otherwise the concrete might get damaged.
- How to do the Flooring Properly
-
- First Make the concrete bed at the same level as the plinth then put a layer of mortar to the flooring work.
- Grooving is advised to ensure that the flooring is fixed properly.
- To get the right flow of the water, plan the slope of the mortar.
- Make sure that the alignment of the tiles is right.
- Tap the tiles with a wooden mallet, and if the sound is consistent, it means the tiles have been fixed properly.
- How to Do Paint Walls
-
- Firstly, while choosing the paint remember to consider both the interior and exterior of the walls.
- Secondly, it is economical to buy painting materials in bulk.
- Thirdly, before applying the paint, check the walls for any cracks fill them up, and clean the walls using sandpaper.
- One more thing, to save your home from water leakage, use water proofing cement-based paints on the outer walls of the house.
- Using washable paint on the indoor walls, helps in retaining the beauty of the walls and also save cost of painting again and again.
- Are you financially ready to build a home?
-
A few steps to follow while planning finance for new home building:
- Budgeting - It's important to have a clear estimate of your savings and expenses.
- Every home should be planned according to the budget.
- It is important to have an idea of how much money each stage of house building requires.
- Pay special attention to savings, this will make your home-building journey smoother.
- Choose the right home loan that suits your requirements.
- Remember to double-check all your documents.
- Plan your home’s plumbing
-
- Plumbing without planning can cause problem in future.
- The inlet should be at an elevation, otherwise it will cause problem in drainage system and hammer the flow of water.
- Always buy ISI mark materials from a genuine dealer.
- And choose your pipes according to the flow of water required.
- The pipes that supply drinking water must be rust resistant and should have a filter.
- When installing the pipeline, check the joints for any leakages.
- Due to leakage water can enter the concrete structure and the wall.
- Don’t lay water supply and drainage lines side by side.
- Choosing The Right Water for Construction
-
- During construction, it is important to use clean portable water.
- This water can obtain from many sources like groundwater with help of borewell, filtering and collecting it in a big tank.
- You can also use water supplied by municipality.
- In their absence, you can get water with water tanks.
- How To Mix Concrete in Drum Mixer?
-
Mixing concrete in a drum mixer is far better than mixing concrete manually by hands. It makes more concrete in less time.
- Choose a drum mixer that has sufficient capacity to mix concrete.
- Make sure you clean the drum mixer from the inside.
- Check for dirt from any previous work and apply a layer of cement slurry from the inside.
- Check the blades of the drum mixer to ensure they are not damaged.
- Put the right quantity and proportion of materials into the concrete mixer.
- Mix the mixture for at least 2 minutes.
- Do not put too much water in the mixture.
- How to do concrete compaction?
-
- Compacting removes air bubbles from inside the concrete making concrete dense which increases it's strength and durability.
- Manual compacting is ideal for small concrete works; you can use a steel rod for rodding or a wooden cross beam for tamping.
- Mechanical compacting is done with the help of vibrators which results in more effective compaction of concrete.
- Surface compacting is done for slabs and flat surfaces. Needle vibrators are generally used for structures like footing, beams, and columns.
- While using the needle vibrator make sure that the needle is straight and the needle should not be touching the reinforcement and framework plates.
- Do not vibrate the needle at a single place for more than 15 seconds and remove the needle slowly.
- Make sure that the vibrator’s shaft pipe does not bend too much or the pipe can break and remember to clean the shaft pipe and needle after work.
- Manual Concrete Mixing | How to Mix Concrete by Hand?
-
- When concrete is required in less quantity it can also be mixed using hands.
- You must make sure to mix it on a surface that has no water seepage.
- First of all, cement and sand should be mixed until they are of one single colour.
- Then pour this mixture down on aggregates and mix it using a spade.
- Dig-up a small pit in the middle of the mixture and pour water in it and start mixing it from the outside in.
- Keep mixing the concrete until it reaches the consistency that you need.
- When mixing concrete with hands, 10% more cement is used.
- Remember, it is important to use the mixture soon after it’s made or else the concrete might set.
- How To Select the Right Tiles for Your Home?
-
Flooring plays an important role in the look and feel of your home. These are some tips to remember when choosing wall and floor tiles:
- You can use vitrified tiles for the flooring. They are more durable.
- You can use ceramic or porcelain tiles for your walls.
- They don’t get dirty easily.
- Kitchen tiles should be scratch and stain proof.
- Bathroom tiles should be skid proof meaning they shouldn’t be slippery.
- For flooring you can also make use of marble or granite slabs.
- What Are the Different Types of Wall Finishes?
-
- Wall finishing adds to the aesthetics of walls and the overall look of the house.
- You can do various types of finishes on your wall, according to yours needs.
- For instant cement plaster finish where in a mortar of cement sand and water is pit on walls.
- This gives walls a smooth matte finish
- If you want a more decorative look from this mixture than you can choose cement textured finish.
- Plaster of Paris finish-With the help of POP you can get intricate design finishes on your walls.
- Wood tile finish-this gives you a wood panel like finish.
- Clay Brick vs Concrete Block
-
Advantages of Concrete Blocks –
- Due to their large size, less jointing material is used and because of their accurate shapeless plastering layer is required for a concrete block.
- A concrete block absorbs less water compared to the brick so the dampness level in walls is also less in comparison.
- Concrete blocks are more economical compared to bricks.
- Lastly, making clay bricks requires fertile soil and burning of wood while on the other hand, making concrete blocks is more eco-friendly.
- This is why concrete blocks are a better option than clay bricks.
- To Summarize, Concrete blocks are stronger, eco-friendly and economical.
- Clay Bricks VS AAC Blocks
-
The different features of AAC blocks:
- AAC bricks are lighter and more efficient than clay bricks.
- AAC blocks are not only economical but also good for the environment.
- There are millions of small air bubbles inside the AAC block which make them lighter but with the right process it is also made stronger than the clay bricks.
- AAC blocks reduce outside noise and heat, making your home noise-free as well as cool in summer and warm in winter.
- Lastly, earthquakes have less impact on buildings constructed from AAC blocks and the risk of fire spread is also less.
- How to Construct Plinth Beam in a Right Way?
-
- Normally concrete of minimum M20 grade is used in the construction of a plinth beam.
- The depth of the beam should be at least 200mm and the upper surface of the beam should be higher than that of the ground.
- Before pouring concrete, the position of the shuttering should be fixed firmly.
- The steel rods should be given a covering of 25mm and proper compacting of the concrete should be done.
- Always remember the proper curing of the beam is also very important.
- How to Fix the Frames of Your Home Windows and Doors?
-
- It is important to fix the frames of your home’s windows and doors correctly.
- So, let's learn some things about fixing doors and window frames.
- Usually most of the frames of doors and windows are made of wood.
- But you can also use materials like metal, PVC or concrete.
- While building a wall the frames are fixed on their determined positions and to keep the alignment in check a plumb bob is used.
- The position of frames and walls are fixed with the help of holdfast which is z shaped.
- Usually, three holdfasts are used for doors and two for windows which are later filled with concrete.
- Also fill the lower and side gaps with concrete.
- How to Protect Your Home from Water Seepage? Damp Proofing I
-
- Damp proofing is an effective way to stop this from happening.
- This is a layer of a mixture of concrete and a waterproofing agent like Crete Pro which is applied on the foundation before the walls are built.
- This layer is 75mm or 3 inches in width.
- This stops dampness from seeping upwards.
- Damp proofing course should always be out of reach of the water that can splash from the ground and it should be 30 cm above the highest level from the ground.
- Right Way to Install Trapezoidal RCC Footing
-
some important things about RCC footings.
- Footing can be of trapezoidal, block or step-shaped according to the need of the structure.
- Before constructing footing, always ram the excavated ground and cover it with 150 mm thick concrete bed.
- This will give you a plain ground for your footing, then fix your reinforcement cage with the right alignment and in the right place.
- Pour concrete on the cement bed after applying a layer of cement slurry on it.
- Use concrete according to the size of the foundation and use shuttering accordingly.
- Always ensure that the size of the foundation is similar to the structural drawing.
- Don’t forget to cure.
- Curing is mandatory once the footing is set.
- Right Way of Concrete Finishing to Smoothen Concrete & Get Uniform Surface
-
These are some tips on concrete finishing:
- Concrete finishing gives concrete a smooth and even surface.
- Concrete finishing should be done after compacting.
- Dry cement should not be sprinkled on a wet concrete surface.
- Concrete finishing is done by screening, floating and trowelling the concrete.
- Plastering Problems and Their Solutions
-
- Excessive trowelling, high ratio of slit in the sand and insufficient curing can cause crazing cracks on the top layer of the plaster.
- To avoid this, you should use good quality of sand.
- Do adequate curing for 10 days and never sprinkle cement on the surface for finishing.
- Sometimes a white layer of coating is formed on the plaster which is known as the efflorescence and it is caused because of the high proportion of impurities like lime present in water, bricks and sand.
- To fix this, clean the area with a dry brush.
- Apply a coat of diluted acid solution on it and let it rest to dry
- Home Layout Marking
-
- Home Layout marking is the first step before construction begins.
- Layout indicates where a structure needs to be placed on your plot.
- If not paid attention to, then your home might differ from the plan.
- Set the boundaries of your home with the help of engineers.
- Do a soil test before excavation begin.
- Looser the soil, deeper the pillar.
- Right Way to Conceal the Piping in the Walls
-
The right way to conceal the piping in the walls of your home
- Firstly, mark the outlets like the tap, shower head, washbasin and their pipe tracks on the wall with the help of a spirit level
- Cut the marked area with the help of a disc blade and ensure the cut is 4-6mm more than the size of the pipes
- Do not cut any beam or column in the process
- Make grooves by digging the portion between the lines with a spade, and fit the pipes in grooves with the help of nails
- Apply mortar and cement between the wall and pipes
- To avoid cracks, use a steel mesh on the groove with the help of nails and mortar.
- Floor Tiles Fixing with Tile Fixo | Tiles Fitting
-
The right way to fix floor tiles with TileFixo:
- Use UltraTech Tilefixo for better bonding between tiles and surface
- Apply a thick layer for 3-6mm mixture on the surface. For a strong bond, use the mixture within 30 mins to fix the tiles
- While fixing wall tiles, start from the bottom and make your way up. Ensure there are no hollow gaps between the wall and tiles
- You can also fix ceramic, marble and granite tiles with Tilefixo UltraTech
- TILEFIXO is a polymer modified cement based high performance, high strength, high quality tile adhesive developed to fix tiles, Natural Stones over walls and floors.
- Suitable for both internal and external, thin bed applications.
- There are four variant of TILEFIXO for different application.
- How to Make Your Home Earthquake Resistant?
-
Here are few measures to make your home earthquake resistant.
- Appoint a structural engineer, he will research structural components and structural systems to ensure the safety and comfort of users.
- He would also check for the probability and intensity of an earthquake in your area.
- Based on that the engineer will suggest the correct plan and process for the construction
- If the structure of the house is uneven then the possibility of damage during an earthquake even higher.
- Do not place any windows or doors in the corners of your home
- The outer wall should have a continuous lintel beam placed over the doors and windows of the house
- There should be a continuous beam on the slab level too.
- Green Home Construction Planning
-
Below are the tips that will help you in the construction planning of an environment friendly green home:
- A green home uses appliances like heater, battery and cooker which run on solar energy
- You can save a lot on your electricity bill if you pay attention to the ventilation in your home
- Rainwater harvesting can also help in increasing the ground water level
- A garden on the roof can help make it a green-rooftop
- How to Excavate a Foundation in a Right Way?
-
- Excavation of a plot is done before laying the foundation for a home.
- Foundation transfers the weight of your home’s structure to the strong soil below foundation.
- If the excavation work is not done in the right way, then the foundation laid is not strong enough which can cause cracks in the walls and pillars.
- Before excavation begins it is important to check whether the right layout of the foundation is marked on the plot.
- Check that the size, pattern, depth and slope of the excavation pits are even.
- Then pour water on excavation beds and start ramming it with hammers.
- Fill the extra excavated areas with plum concrete.
- Always remember that there should not be any hollow spaces or soft spots.
- During deep excavations, support the sides with wooden structures so it won’t fall.
- The depth of excavation for a 2-3 story building should be about 1.5-2 metres.
- This also depends on the quality and the strength of the soil.
- This is the right way to excavate while constructing your home.
- Excavation bed should be rammed after pouring water on it If the excavation is deep, support it with wooden planks Fill the extra excavated area with plum concrete.
- How to Avoid Shrinkage Cracks?
-
The ways avoid Shrinkage cracks and to protect your home from them:
- Always moisten the shuttering before pouring in the concrete and do not pour concrete while the shuttering is dry
- Concrete placing should be done in the morning or the evening
- While placing and setting the concrete, protect it from wind and harsh sunlight with the help of a tarpaulin
- Don't let the moisture in the concrete dry. Curing should be done from time to time.
- How much water to mix with concrete?
-
6 steps to building a concrete staircase:
- Water chemically reacts with cement to make it stronger.
- Normally drinking water is used while mixing concrete.
- Avoid using saline water while mixing concrete because this can cause corrosion in the RCC steel rod.
- Remember adding excess water to your concrete mixture can reduce the strength and durability of the concrete.
- Extra water may lead to cracks in the concrete.
- Always remember single UltraTech cement bag usually uses 20 to 27 litres of water.
- Step by Step Home Construction Guide
-
Steps involved in the construction of the home are:
- After making your home's plan get the exact plot marking from a government office and get your plot surveyed by a surveyor.
- Clean the whole plot and get the layout marked by an architect after which you can begin the excavation.
- After excavation you may start laying the foundation.
- Construct a plinth beam on the foundation to strengthen the wall of your home.
- If you are not constructing a plinth then a damp proof course should be done to waterproof your home.
- Now you can start constructing the walls.
- Avoid dead weights on doors and windows, construct lintel beams on the walls.
- Then start the roof and slab work.
- Now do plastering and curing of the structure.
- Then begin with the flooring and tiling of your home followed by light fitting, plumbing, fixing doors and windows.
- Lastly start painting work of your home.
- How to build a concrete staircase in just 6 simple steps?
-
- Get an engineer to design the staircase.
- After the foundation work is done, place the shuttering accordingly to design.
- Then place steel roads according to drawing.
- Let the concrete dry after the concreting work is done.
- Proper curing and finishing of the structure should be done.
- How to Plan Your Home’s Ventilation?
-
- Planning your home’s ventilation system is important for your house as it helps keep dampness in check and stop fungus from spreading which keeps the house odor-free and the members of the house in good health
- Home windows placed in the right direction can improve the airflow of the house
- Make use of home ventilation systems like kitchen chimneys and exhaust fans in the bathroom for better ventilation
- Benefits of Using Manufactured Sand (M-Sand) or Crushed Stone Sand
-
Manufactured sand (M Sand) or Crushed Stone Sand is a better option than river sand in your home’s construction Below are the Benefits of using Manufactured Sand (M Sand):
- Manufactured sand is cleaner as it does not contain clay, dirt, and other impurities
- Due to good gradation of manufactured sand the strength of the concrete made by it is increased
- Concrete made using manufactured sand does not have problems like segregation, honey-combing, or capillaries which increase it's durability and strength
- Manufactured sand or Crushed Stone Sand is an economical and better option compared to river sand
- It is also good for the environment too.
- What are the Common Terms of Construction?
-
Common terms of construction:
- Foundation – The foundation of a home transfers the whole load of the building to the ground which is why it is recommended the you should consult an engineer before deciding the depth and width of the foundation of your home
- Plinth beams – A plinth act as a strong support between the foundation and the wall. It’s an RCC beam that helps the foundation to transfer the load of the whole home to the ground.
- Footing – A footing distributes the columns load to a larger area which improves the load bearing capacity of the structure.
- Columns and beams – Beams transfer the load from the slab to the columns and the columns transfer the whole load to the foundation.
- All these structures provide strength to the home in their own ways so one should be cautious while constructing them.
- Coarse Aggregates
-
for selecting the right coarse aggregates for the construction of your home:
- Using the wrong coarse aggregate may affect the strength of your home.
- Make sure the amount of sand and dust is low in the aggregate.
- Hard and less shiny aggregates make a strong bond with the cement .
- Aggregates that absorb a lot of water are not good for making concrete.
- Storing different sizes of aggregates apart makes mixing concrete easier.
- How To Insulate Your Home?
-
There are four main types of insulation in a home.
- First, window insulation – Cold from outside mainly enters a home from windows and doors. To prevent this, you can install double glass windows with a rubber gasket in it.
- Second, floor insulation – By installing a layer of wooden flooring/laminate flooring /cork-based flooring you can prevent your home from the cold entering through the ground.
- Third, walls and roof installation – Creates air pockets in the walls while building it or use ACC blocks as building materials which will provide insulation from harsh sunlight. Apply light colour on the walls, especially on the western wall of your home which will resist heat from the sun. Use China mosaic, light painted or clay tiles on the roof slab.
- Fourth insulation from sound – A wall built from AAC blocks can absorb exterior sound. You can even laminate the interior surface of the walls. Double glass window can also resist exterior sounds. These were some ways you can insulate your home.
- Construction Site Safety Rules & Tips for Masons |Preventing from Covid-19I
-
some important health and safety Rules and Tips that should be followed on a construction site.
- Talk to your contractor, about workers and mason's health and safety informing everyone in detail about the safety guidelines on a regular basis.
- Only allow the workers in good health to work.
- Do not allow outsiders on the construction site.
- Conduct regular thermal checks and ensure that the workers sanitize their hands before starting the work.
- Workers should wash their hands every two hours with liquid wash or soap.
- Everyone on the construction site must wear helmets, gloves, and masks.
- Follow social distancing protocols all the time and maintain a distance of at least 6 feet.
- Avoid handshakes with anyone on the construction site.
- Allot a fixed place for food consumption and make sure social distancing is being followed while having food.
- Do not allow consumption of tobacco, gutkaa, paan, and spitting.
- Anyone with symptoms of cough, cold, or running nose, do not allow them to work on the site and ask them to consult a doctor.
- Educate the workers on the importance of sanitizing before meeting their family members after work.
- Make sure a list of hospitals and emergency contacts are available at the construction site.
These were a few important health and safety guidelines to be followed on the construction site when you resume the work post lockdown.
- How Insulation Protects Your Home from Exterior Cold, Heat & Sound?
-
- Window Insulation – Cold from outside mostly enters a home through windows and doors. To prevent this, you can install double glass windows with a rubber gasket in them.
- Floor Insulation – By installing a layer of wooden flooring/laminate flooring/ cork-based flooring, you can prevent your home from the cold entering through the ground.
- Walls and Roof Insulation – Create air pockets in the walls while building it or use AAC blocks as a building material that will provide insulation from harsh sunlight. Apply light color paint on your walls, especially on the western wall of your home which will resist the heat from the sun. Use china mosaic, light painted, or clay tiles on the roof slab.
- Insulation from Sound: A wall built from AAC blocks can absorb exterior sound. You can even laminate the interior surface of the walls or cover them with sound insulation panels. Double glass windows can also resist exterior sounds.
- Benefits of Using Manufactured Sand (M-Sand) or Crushed Stone Sand
-
Manufactured sand (M Sand) or Crushed Stone Sand is a better option than river sand in your home’s construction Below are the Benefits of using Manufactured Sand (M Sand):
- It is important to know about the cost of building a home before construction.
- Let’s understand the stage of construction their timeline and division of expenses.
- The division can change according your needs, At the planning stage, making the home plan getting documents and approvals cost about 2.5 %
- Excavation work about 3%
- 12% is spent for making for foundation and footing
- And RCC framework makes up 10% of the budget.
- The slab and roof cost makeup 13%
- The brickwork and plastering cost amount to 17%
- 10% of the budget is used for flooring and tilling.
- 8% get used to electric work
- Plumbing cost 5%
- While doors and windows cost 8%
- Painting and finishing cost 6%
- and 5.5% respectively
- How To Build a Flood Resistant House
-
- First you need to take some necessary steps if your plot is flood- prone region.
- Work on an appropriate solution with your engineer.
- On the way to do this by raising the level of your ground floor about the flood level
- Make sure the foundation of your home is constructed on a hard base
- Your foundation need to be at least 2 meter deep
By making large drains beside your plot, you can change the direction of the flow of water - Also, if your plot is near the source of flowing water your home should be at least 10 to 15 meter away from the bank.
- Why Steel Is Used as Reinforcement?
-
- TMT Bars have ribs on them which helps the concrete and rods create a firm hold and stick together.
- Ribbed steel rods ranging from 8mm thickness to 32mm thickness are available in the market.
- You can use them according to the structural design.
- The rods are tied into a mesh or net-like structure while constructing slabs.
- In the construction of pillars and beams, rods are made into a cage like structure.
- Always make sure to choose the rods that are ISI approved.
- Store the iron rods in a dry environment so that they don’t rust.
- These were some common facts about reinforcement steels.
- How to Build a Concrete Roof: Step by Step Guide
-
Following are the checklist on How to Build Concrete Roofs
- Shuttering is made for the construction of the roof. It is made out of wood or steel. Bamboos or scaffolding props are used to support it so that the structure doesn’t collapse;
- The mesh made of steel bars in then placed along with the bent-up bars on the sides;
- Cover blocks are placed below these steel rods that keep the bars fixed in the position;
- Concrete mix of sand, cement and aggregate is poured;
- Waterproofing compound like weather pro is added to the mix;
- After the concrete is placed the process of compacting begins;
- It is important that the concrete is levelled correctly. The next step after the compacting is finishing. On the upper surface of the slab, small pounds are constructed for curing. The structure is cured for 2-3 weeks. This strengthens your slab.
- Then remove the shuttering. This is how concrete roof is made for home.
- Are You Planning to Build Your Own Home?
-
- Planning is the most important step before building a home.
- Think about your family’s needs Keep their future in mind as you start planning and estimate the budget correctly.
- Conduct a survey for your plot and mark it's boundaries and get a perfect structure plan made by your engineer.
- Understand the modern and effective construction practices from your engineer and prepare an estimate for your construction.
- Then after a thorough check choose an experienced contractor and make a contract to build a home with him.
- Before starting the construction make sure all your permissions and documents are ready.
- What is Birla White Putty?
-
- Birla white putty is water resistant, cement – based putty
- This ensure better bonding, coverage and finish
- It's prevent crusting, algae and fungus
- This putty can be easily applied on the surfaces of the plaster, RCC and concrete
There are 2 types of Birla white putty Unlike POP, it doesn’t absorb water.
- Testing of Concrete: Concrete Testing Method
-
- A workability test is done to see whether the concrete is right for construction or not
- A cone-shaped mould id used for this test.
- Fill the mould with the concrete mixture and let it set for two minutes.
- On lifting the cone, the concrete turns to slump.
- Measure the distance in levels of the cone and slump.
- If the concrete doesn’t stay firm, it can’t be used.
- Step By Step Construction of Basement
-
- After excavation, lay the PCC bed for levelling and add the waterproofing agent to it.
- Fix the steel and formwork for foundation and columns on the PCC bed.
- After building the wall, waterproof it from both the sides and backfill with soil.
- Connect all the columns with the foundation’s plinth level to the beams from both the sides.
- Plan the drainage carefully.
- Different Uses of White Cement
-
- You can use white cement to get the desire shades of colours for your home.
- It acts as a base for fixing designer and mosaic flooring.
- It act as a suitable material for the joining of the tiles.
- White cement maintain the real shades of colours.
- Walls can also be whitewashed with white cement.
- Concrete Compressive Strength Test
-
Following are the checklist on How to Build Concrete Roofs
- The compressive test is done after the concrete has hardened.
- Cube module of 150mm x 150mm x 150mm is used.
- Compacting is done after filling the concrete in the mould.
- Once the cube is the hardened, it is kept in water for 28 days.
- The cube should be placed in the centre of the plates of the testing machine.
- How to Decide the Size of Kitchen?
-
- The kitchen is divided into 4 parts – Storage, sink, cooking & chopping & cutting area.
- If the house is of 50 square meter, then the minimum area of the kitchen should be 30 square meter.
- The kitchen can be 4.50 square meter if the area of the house is 50 square meters.
- The height of the counter should be 85 cm – 93 cm less and the dept should be 60 less.
- Over counter cabinet should be 60-70 cm higher than the counter and the dept should be half of the kitchen counter.
- Plan The Corridor For A Pleasant Home
-
Plan the Corridor for A Pleasant Home, as it is one of the most important spaces of the home.
- A corridor is a vital part of the home, because it leads to other rooms in the house.
- For designing a well-planned corridor, there are a few factors to consider.
- First, the width of the corridor should be about 3-4 feet wide.
- Second, the corridor should be positioned so that it is in a well-light area.
- Third, the corridor should be about 10-12 feet long.
- Fourth, the corridor should be well-ventilated and temperature controlled.
- Fifth, the corridor should have plenty of space for furniture.
- Sixth, the corridor should have a door to separate it from other rooms in the house.
- Seventh,the corridor should have a railing or banister to prevent falls.
- Finally, the corridor should have a sturdy flooring and walls to keep the corridor clean.
- Learn How to Plan Your Home Dimensions
-
- A bedroom area should be 15 to 20 square meters.
- A living room should have a space of 25 square meters.
- Keep an area of 15 square meters for a children room.
- Keep the area of 15 square meter for the kitchen and dining section 10-15 sq. meters.
- Should be allocated for the kitchen, and rest for the dining area.
- The bathroom should have an area of 6 sq. meters.
- And the minimum ceiling height of 2.30 meters.
- Home Construction Contract Tips
-
- There are two types of contracts – full contract or labour contract.
- Specify the space of work in the contract Set deadline for each stage.
- Clearly state payment schedules and budget estimates.
- Specify the suitable action plan for dispute resolution.
- Be sure to check the contractor’s previous work.
- You can always consult your legal expert.
- Big Mistakes In Brick Masonry: Brick Masonry Tips
-
- Irregular shapes bricks affect the quality of walls.
- Mortar’s strength is affected by the wrong mix.
- There is a danger of water absorption due to use of dry bricks.
- Direct alignment of bed joints should not be done.
- Insufficient curing reduces the strength of the wall.
- It Is necessary to work under expert supervision.
- Stone Masonry Mistakes to Avoid: Stone Masonry Tips |
-
- The outside and inside on the wall should be made at the same time.
- The joint should be not thicker than 2.0-2.5 c.m
- Keep in mind that the stone should not be visible outside the wall.
- Keep in mind the ratio of cement to water.
- Walls should be cured for a minimum for 7 days.
- Building a Cowshed: Cowshed Construction Tips
-
- Walls of shed should not be 8 feet high.
- Use waterproofing agent to get protection from moisture.
- Floor should be made from grooved concrete or cement bricks.
- Make grooves for fodder and for manure build wide gutter.
- Doors should be 7 feet wide and 5 feet high.
- Keep ample distance between your house and shed.
- How To Do Construction of Well? How To Build a Well?
-
- Firstly, choose the right place for digging the well.
- Make the separate pile of stone and soil after excavation.
- Get all work done under the supervision of experts.
- Stop digging when source of water is start Then start casing it.
- RCC rings can reduce the risk of subsidence.
- Use motor pump to pump out the water.
- Building a Biogas Plant: Biogas Plant Building Tips |
-
- Make 15cm thick foundation for underground digester tank.
- Finish the work of tank with the help of brick or concrete and make dividing wall.
- Fixed a dome-shaped ceiling above the digester tank and fit gas pipe in it.
- Create a inlet pit of feeder pit from underground beside the tank.
- Create an outlet pit or overflow pit from the other side.
- Bring the pipe from the gas to the kitchen for the use.
- How To Avoid Common Mistakes in Waterproofing?
-
- Do not neglect water damage.
- If slope of the mud is outside the house towards foundation and if slope of the roof is not correct then the moisture will spread all over.
- Using sealing paste to fill the cracks of the plaster is not the right thing to do to avoid moisture.
- Waterproofing should always be done through expert and use the right waterproofing products only.
- Importance Of Engineers and Architects in Home Construction
-
- In Home Construction cannot be overstated, especially during planning and supervision.
- When considering home construction, you need to hire the right engineers and architects to build your home.
- Building engineers look after the support, load and building materials.
- During the construction process, they review and evaluate plans as well as inspect the structure and it's surroundings. Architects mainly focus on the planning phase.
- They focus on the design of a building or a home.
- Engineers - Along with the drawing of the house, they also strengthen the structure They also see oversee the layout of electrical wiring and plumbing
- Architect - They design the look and elevation of your home
- Engineers and architect are familiar with the area’s building codes and regulation
- Types Of Soil And It's Affects On Foundation: Good Soil For Foundation
-
- Peat soil is not suitable for laying foundation.
- Laying foundation is clay soil creates pressure on the foundation.
- Loose sand may have a gap under the foundation.
- Granular soil is best for laying the foundation of a home.
- Rocky based strengthen the foundation Soil testing should done before construction of home.
- How to Build Your Home Based on Different Climatic Conditions
-
In different region of our country climate plays an important role. Let understand few things about climate and construction:
- In hot and dry region, sunlight heat ups the home.
- Painting the roof plaster with heat reflective paint .
- Can help you lower heat absorption.
- The main door should face the north south direction.
- To avoid excess sunlight.
- Avoid building door and windows to facing west.
- Hollow concrete blocks provide better isolation.
- Which helps regulate the temperature inside the home.
- Remember to plan the ventilation and plan ventilation system carefully.
- In high rainfall region build lintel beams over doors and window.
- Design the sloping roofs so that water washes away easily.
- And remember to waterproof your home’s structure.
- In cold region build the doors and windows in the north and west.
- To wet warm sunlight into your home.
- Use good insulating material While constructing windows, doors and flooring.
These were a few tips on building a home in different climatic condition.
- अपने घर के लेआउट की योजना कैसे बनाएं?
-
कमरों की संख्या, उचित वेंटिलेशन, और जल निकासी प्रणाली, सुविधाजनक भंडारण स्थान और पर्याप्त बाहरी स्थान के आधार पर एक अच्छी होम लेआउट योजना का आकलन किया जा सकता है। आर्किटेक्चर और बिल्डिंग इंजीनियरिंग में, एक फर्श योजना ऊपर से देखे गए कमरे या भवन का एक छोटा आरेख है। घर की डिजाइन या निर्माण करते समय फ्लोर प्लान या हाउस बिल्डिंग प्लान महत्वपूर्ण भूमिका निभाते हैं। तल योजनाएं दीवारों, खिड़कियों, दरवाजों के साथ-साथ निश्चित प्रतिष्ठानों जैसे कि बाथरूम जुड़नार, और रसोई कैबिनेटरी के स्थान का वर्णन करती हैं। अपने घरों के लेआउट की योजना बनाते समय आपको कुछ महत्वपूर्ण बिंदुओं की जांच करने की आवश्यकता होती है जैसे कि,
- मृदा गुणवत्ता परीक्षण
- भूमि की समतलता (जमीनी स्तर)
- वास्तु (यदि आप इसमें विश्वास करते हैं)
- मौसम
- पड़ोस के घरों की स्थिति
- एक ईंट का परीक्षण कैसे करें?
-
निर्माण के लिए सर्वोत्तम गुणवत्ता वाली ईंटों का चयन करना महत्वपूर्ण है।
- ताली परीक्षण - जब आप दो ईंटों को आपस में टकराते हैं, तो आपको एक धातु की 'क्लिंक' सुनाई देनी चाहिए।
- ड्रॉप टेस्ट - जब आप इसे लगभग 4 फीट की ऊंचाई से गिराते हैं, तो ईंट टूटना या टूटना नहीं चाहिए।
- दरार परीक्षण - ईंट सभी तरफ से एक समान और किनारों पर चिकनी होनी चाहिए, अर्थात कोई दरार नहीं होनी चाहिए।
- वाटर वेट टेस्ट - जब आप इसे एक बाल्टी पानी में डुबोते हैं तो इसका वजन 15% से अधिक नहीं बढ़ना चाहिए
- सही प्लॉट का चुनाव कैसे करें?
-
- निर्माण के लिए आपके द्वारा चुना गया प्लॉट सड़कों से अच्छी तरह जुड़ा होना चाहिए।
- इसमें बुनियादी उपयोगिताओं पानी और बिजली का प्रावधान होना चाहिए।
- प्लॉट यातायात, शोर और प्रदूषण से दूर होना चाहिए।
- सुनिश्चित करें कि आपका प्लॉट अस्पतालों, स्कूलों और सार्वजनिक परिवहन के करीब है।
- भूखंड भूकंप और बाढ़ से ग्रस्त नहीं होना चाहिए।
- प्लाट पर किसी प्रकार का अतिक्रमण या किसी प्रकार का मुकदमा नहीं होना चाहिए।
- निर्माण के लिए प्लॉट चुनते समय इन कुछ बातों का ध्यान रखना चाहिए।
- स्टील कैसे चुनें?
-
अपने घर के लिए सही स्टील का चयन करना।
- रॉड के व्यास, आईएसआई मार्क, ग्रेड और वजन की जांच करें।
- हमेशा स्टील या टीएमटी बार किसी प्रतिष्ठित ब्रांड से ही खरीदें।
- जब आप स्टील की छड़ को मोड़ते हैं, तो उसकी सतह पर दरारें नहीं दिखनी चाहिए।
- टीएमटी बार जंग और ढीली धूल से मुक्त होना चाहिए, और इसकी पसलियां बरकरार होनी चाहिए।
- स्टील या टीएमटी बार को कभी भी जमीन पर न रखें क्योंकि जमीन से नमी के कारण जंग लग सकता है।
- दीमक का इलाज?
-
- आपकी नींव, खंभों और फर्श पर एक रासायनिक लेप लगाया जाता है।
- निर्माण पूरा करने से पहले अपने घर का इलाज करना महत्वपूर्ण है।
- क्योंकि इस अवस्था में कम रासायनिक और मेहनत लगती है
- यह दीमक की समस्या को भी पूरी तरह से खत्म करने में मदद करता है
- नींव के काम की निगरानी कैसे करें?
-
- नरम मिट्टी पर नींव बनाना खतरनाक है।
- इसलिए, सुनिश्चित करें कि श्रमिक तब तक खुदाई करते रहें जब तक कि उन्हें कठोर चट्टान न मिल जाए।
- संरेखण की जांच करना महत्वपूर्ण है और जब आप कंक्रीट भर रहे हों, तो सलाखों को हिलना नहीं चाहिए।
- मिश्रित होने के तुरंत बाद नींव में कंक्रीट का उपयोग किया जाना चाहिए।
- एक बार खंभे बन जाने के बाद, उन्हें पानी से ठीक करना सुनिश्चित करें।
- आपकी नींव की गहराई और चौड़ाई मिट्टी और आपके द्वारा बनाई गई संरचना पर निर्भर करती है।
- यदि आपको किसी प्रकार की सहायता की आवश्यकता हो तो किसी अनुभवी इंजीनियर से सलाह लें और कोई भी निर्माण कार्य शुरू करने से पहले दीमक-रोधी परीक्षण करना न भूलें।
- प्लॉट खरीदने से पहले जाँच/सत्यापित करने के लिए कानूनी दस्तावेज
-
प्लॉट खरीदते समय ध्यान रखने योग्य कुछ महत्वपूर्ण बातें यहां दी गई हैं।
- प्लॉट खरीदने से पहले यह जांच लें कि प्लॉट विवादित तो नहीं है।
- कानूनी विवादों में प्लॉट खरीदने से बचें - प्लॉट खरीदने से पहले, यह जांचना याद रखें कि प्लॉट विवादित तो नहीं है।
- मूल दस्तावेजों की जांच करें - यदि भूखंड के मूल दस्तावेज गायब हैं, तो यह एक बंधक के कारण हो सकता है।
- डीड चेक करें - हमेशा चेक करें कि घर बेचने वाले के पास घर बेचने का अधिकार है या नहीं।
- सर्वे सर्वेयर - सुनिश्चित करें कि प्लॉट की सीमाओं को चिह्नित करने के लिए आपको प्रमाणित सर्वेयर मिले।
- आम घर बनाने की गलतियाँ
-
घर बनाने की गलती से बचने की सूची यहां दी गई है
- हमेशा एक इंजीनियर और वास्तुकार से परामर्श लें - अपने नए घर के निर्माण की योजना बनाने के लिए एक विशेषज्ञ और अनुभवी इंजीनियर और वास्तुकार को शामिल करना एक अच्छा विचार है।
- अपने ठेकेदार का चयन सावधानी से करें - वर्षों के अनुभव और विशेषज्ञता के साथ हमेशा सर्वश्रेष्ठ ठेकेदार का चयन करें।
- अपने परिवार की जरूरतों को समझें - गृह निर्माण योजना शुरू करने से पहले अपने परिवार से बात करें और प्रत्येक सदस्य की जरूरतों को समझें।
- अपने पड़ोसियों के साथ चर्चा करें - अपने पड़ोसियों के साथ इस बारे में चर्चा करना भी बुद्धिमानी है कि क्या सही है और क्या काम करेगा।
- अनापत्ति प्रमाण पत्र प्राप्त करें - नया घर बनाते समय सबसे बुरी बात यह है कि आप खुद को कानूनी झंझट में डाल दें। किसी भी प्रकार का निर्माण कार्य शुरू करने से पहले हमेशा सभी कानूनी दस्तावेजों की जांच करें और एनओसी प्राप्त करें।
- अपने बजट की योजना बनाएं - बजट के लिए पहले से योजना बनाना गृह निर्माण के सबसे आवश्यक भागों में से एक है।
- गुणवत्ता से कभी समझौता न करें - हमेशा सर्वोत्तम गुणवत्ता वाली निर्माण सामग्री चुनें। बाजार में प्रसिद्ध ब्रांड के साथ जाएं।
- सीमेंट स्टोर करने का तरीका
-
सीमेंट भंडारण युक्तियों का ध्यान रखना चाहिए
- सीमेंट की थैलियों को खिड़की रहित कमरे में रखें।
- अपने सीमेंट बैग को एक निश्चित ऊंचाई पर रखें जैसे कि ऊंचे लकड़ी के प्लेटफॉर्म पर।
- सीमेंट की बोरियों को जमीन पर न छोड़ें।
- सीमेंट की थैलियों को नजदीकी दीवार और छत से कम से कम 2 फीट की दूरी पर रखें।
- एक दूसरे के ऊपर 15 बैग से ज्यादा न रखें। यह खतरनाक हो सकता है और सीमेंट गांठ में बदल सकता है।
- बारिश के दौरान सुनिश्चित करें कि आप सीमेंट को तिरपाल या प्लास्टिक की थैलियों से ढककर सुरक्षित रखें।
- सीमेंट की उम्र जानने के लिए सीमेंट की बोरियों पर तारीख का लेबल लगाएं।
- दीवार प्लास्टर का काम
-
कुछ दीवार प्लास्टर कार्य युक्तियाँ और तकनीकें जिनकी आपको देखभाल करने की आवश्यकता है
- प्लास्टर लगाने से पहले सुनिश्चित करें कि दीवारों में थोड़ी नमी है। यह दीवारों को प्लास्टर में पानी को सोखने से रोकेगा।
- जब आप प्लास्टर करने की योजना बना रहे हों तो सुनिश्चित करें कि आप कम मात्रा में मिलाते हैं क्योंकि इससे प्लास्टर का तुरंत उपयोग किया जा सकता है।
- यदि दीवारों की सतह समतल नहीं है, तो प्लास्टर का मोटा लेप लगाएं।
- प्लास्टर लगाने के बाद 7-10 दिनों तक इलाज करना जरूरी है।
- प्लास्टर तराई के प्रकार
-
- कंक्रीट तराई में नमी की मात्रा को बनाए रखने में मदद करता है।
- कंक्रीट की ताकत और स्थायित्व बढ़ाने के दोहरे फायदे हैं।
- तराई तब किया जाना चाहिए जब संरचना की सतह आसानी से चलने के लिए पर्याप्त कठिन हो।
- स्लैब को ठीक करने के लिए आपको सतह पर 15 मिमी पानी के तालाब बनाने चाहिए।
- तालाबों में पानी भरते रहें और पानी को सूखने न दें।
- बीम, दीवारों और स्तंभों पर तराई के लिए, आपको इन संरचनाओं को गीले जूट बैग या गीली बोरियों से ढक देना चाहिए।
- नमी बनाए रखने के लिए समय-समय पर संरचना को पानी देना चाहिए। प्लास्टर तराई के प्रकार
- कंक्रीट का तराई तब किया जाना चाहिए जब संरचना की सतह आसानी से चलने के लिए पर्याप्त कठिन हो।
- पॉन्डिंग - स्लैब को ठीक करने के लिए आपको सतह पर 15 मिमी पानी के तालाब बनाने चाहिए। तालाबों में पानी भरते रहें और पानी को सूखने न दें। इसे पोडिंग कहा जाता है।
- गीला तराई - कंक्रीट बीम, दीवारों और स्तंभों पर तराई के लिए, आपको गीले जूट बैग या गीली बोरियों के साथ संरचनाओं को ढंकना चाहिए। नमी बनाए रखने के लिए, संरचना को समय-समय पर पानी पिलाया जाना चाहिए। इसे गीला तराई कहा जाता है।
- विद्युत कार्य करते समय अपने ध्यान में रखने के लिए सुरक्षा युक्तियाँ
-
घर पर बिजली का काम करते समय आपको कुछ महत्वपूर्ण विद्युत सुरक्षा का पालन करना चाहिए:
- अपने घर पर अपने सभी बिजली के काम के लिए हमेशा एक पंजीकृत विद्युत ठेकेदार से सलाह लें।
- विद्युत कार्य करने से पहले अपने विद्युत कनेक्शन स्पॉट की योजना बनाएं।
- यह महत्वपूर्ण है कि आप अपने इंजीनियर से पुष्टि करें कि क्या अर्थिंग ठीक से की गई है।
- हमेशा एक प्रतिष्ठित ब्रांड से बिजली की सामग्री खरीदें और प्रत्येक उत्पाद पर आईएसआई टैग की जांच करें।
- सुनिश्चित करें कि एक सॉकेट में बहुत अधिक जोड़ या कनेक्शन बिंदु नहीं हैं।
- अपने सभी बिजली के उपकरणों के लिए फ्यूज का प्रयोग करें।
- सुनिश्चित करें कि आपके बिजली के कनेक्शन पानी, अत्यधिक गर्मी और बच्चों से दूर रखे गए हैं।
- कोई भी नग्न तार न छोड़ें। यह खतरनाक हो सकता है।
- वर्षा जल संचयन
-
- वर्षा जल का उपयोग भूजल के स्तर को बढ़ाने के लिए किया जाता है।
- रिचार्ज पिट पर काम शुरू करने के लिए सबसे पहले आपको एक गड्ढा खोदना होगा।
- गड्ढे की चौड़ाई 1-2 मीटर और गहराई 2-3 मीटर होनी चाहिए।
- फिर इसे पत्थरों, मोटे समुच्चय और रेत से भरें।
- अपने गड्ढे की सुरक्षा के लिए, इसे गंदगी से ढक दें और रेत की ऊपरी सतह को नियमित रूप से साफ करें।
- यह पानी को आसानी से जमीन में रिसने में मदद करता है।
- जिन क्षेत्रों में बारिश का पानी इकट्ठा हो जाता है, वहां पानी को रिचार्ज पिट तक पहुंचाने के लिए आपको पाइप का इस्तेमाल करना चाहिए।
- इस पानी को स्टोर करके घर के कामों में इस्तेमाल किया जा सकता है।
- जमीन के मुकदमे से खुद को कैसे बचाएं?
-
प्लॉट चुनने से पहले हमेशा सुनिश्चित करें कि आप सभी प्रासंगिक दस्तावेज मांगते हैं। यदि मालिक आपको सभी मूल दस्तावेज देने से मना कर देता है तो एक नहीं लें।
- अगर दस्तावेज बैंक के पास हैं तो डिस्चार्ज लेटर मांगें।
- टाइटल डीड में उसका नाम होना चाहिए।
- अपने उप-पंजीकरण कार्यालय से एक ऋणभार प्रमाणपत्र लें।
- अगर जमीन के कई मालिक हैं तो रिलीज सर्टिफिकेट मांगें।
- किसी अनुभवी वकील से राय लें। भूमि मुकदमेबाजी से खुद को बचाने के लिए ये कुछ सुझाव हैं।
- सही निर्माण टीम कैसे चुनें?
-
जब आप अपना घर बना रहे हों तो एक सफल परिणाम की कुंजी सही निर्माण टीम या कंपनी का चयन करना है।
- इलाके के अनुभवी ठेकेदारों और राजमिस्त्री से बात करके शुरुआत करें।
- उपयोग की गई सामग्रियों और निर्माण प्रक्रिया के बारे में चिंताओं की बेहतर समझ प्राप्त करें।
- हमेशा विकल्प रखें और इलाके के अन्य लोगों से संदर्भ मांगें।
- अपने घर के निर्माण के लिए आपके द्वारा चुनी गई निर्माण टीम के पिछले कार्यों की जाँच करें।
- हमेशा राजमिस्त्री और ठेकेदार के साथ अंतिम लेआउट और योजना पर चर्चा करें।
- निर्माण समयरेखा, सामग्री, श्रम आवश्यकता और बजट अनुमानों का अनुमान लगाएं।
- ठेकेदार से उनके संपर्क विवरण के साथ सभी दस्तावेज प्राप्त करना न भूलें।
- अंतिम योजना पर अपने इंजीनियर और वास्तुकार से राय लें।
- निर्माण में भरण का महत्व
-
- नींव पूरी तरह से सेट होने के बाद ही भरण की जानी चाहिए।
- यह 6 इंच के कंक्रीट बेड पर किया जाता है।
- भरण हमेशा परत दर परत की जानी चाहिए और भरना एक ही बार में नहीं करना चाहिए।
- सुनिश्चित करें कि कोई भी परत ऊंचाई में 10 इंच से अधिक न हो।
- हर परत के बाद, पानी छिड़कें और रेमर से सतह को अच्छी तरह से गूंथ लें।
- जिससे फिलिंग सख्त हो जाएगी और वह अच्छे से सेट हो जाएगी.
- अपने घर को वाटरप्रूफ कैसे करें ?
-
- कंक्रीट के काम में कोई खराबी नहीं होनी चाहिए क्योंकि अगर कॉम्पेक्टिंग ठीक से नहीं की गई तो इससे बीम और स्लैब में पानी का रिसाव हो सकता है।
- ढलान की सावधानीपूर्वक योजना बनाएं, सुनिश्चित करें कि पानी सही दिशा में बह रहा है और एक जगह जमा नहीं होता है।
- पानी आपकी संरचना को जमीन के माध्यम से भी नुकसान पहुंचा सकता है, इसलिए कंक्रीट के बिस्तर को नम होना चाहिए।
- यह आपको जमीन से प्रवेश करने वाले पानी के खिलाफ घर की सुरक्षा प्रदान करता है।
- सीमेंट का चयन कैसे करें?
-
सीमेंट चुनने का सही तरीका:
- हमेशा असली डीलर से ही ब्रांडेड सीमेंट चुनें।
- सीमेंट खरीदते समय निर्माण तिथि देखना न भूलें।
- सीमेंट बैग को स्पर्श करें और सुनिश्चित करें कि अंदर कोई गांठ न बने।
- सीमेंट की बोरी को हाथ से सिला नहीं जाना चाहिए।
- सीमेंट की थैली पर ISI का निशान देखें।
- निर्माण स्थल सुरक्षा
-
सुरक्षित निर्माण स्थल सुनिश्चित करने के लिए -
- निर्माण स्थल पर प्राथमिक उपचार किट होना अनिवार्य है।
- साइट पर प्रत्येक व्यक्ति के पास सुरक्षा हेलमेट और जूते होने चाहिए।
- सुनिश्चित करें कि काम के दौरान राजमिस्त्री दस्ताने पहने हुए हैं।
- हेलमेट को हमेशा टाइट रखें।
- निर्माण स्थल को साफ-सुथरा रखें और निर्माण स्थल के आसपास नुकीली चीजें नहीं रखनी चाहिए।
- सुनिश्चित करें कि रासायनिक उत्पादों पर रासायनिक चेतावनी का संकेत है।
- साइट पर खुले लाइव वायर न छोड़ें।
- साइट पर बच्चों को न लाने की सलाह दी जाती है।
- सुरक्षा के लिए, ऊंचाई पर काम करने वाले राजमिस्त्री को अपने हार्नेस हुक करने चाहिए।
- दीवार टाइलें कैसे स्थापित करें | दीवार टाइलें फिटिंग प्रक्रिया | दीवार टाइलें फिक्सिंग कुछ महत्वपूर्ण दीवार टाइल फिटिंग युक्तियाँ जो बताती हैं कि दीवार टाइलों को पूरी तरह से कैसे स्थापित किया जाए:
-
- किसी टाइल को टाइट ग्रिप के लिए प्लास्टर की परत खुरदरी होनी चाहिए।
- दीवार की टाइलें लगाने से पहले दीवारों पर पानी छिड़क कर साफ करें और फिर सीमेंट के घोल की एक पतली परत डालें।
- सीमेंट पेस्ट को टाइल्स के पीछे लगाएं और ध्यान से दीवार पर लगाएं।
- आप बाजार में उपलब्ध रेडीमेड टाइल एडहेसिव का भी उपयोग कर सकते हैं।
- टाइलें लगाते समय दबाव हल्का होना चाहिए और यह सुनिश्चित करना चाहिए कि संरेखण सही है।
- 24 घंटे के बाद टाइल्स के जोड़ों पर ग्राउट लगाएं और टाइल की सतह को साफ रखें।
- सही तरीके से शटरिंग कैसे करें
-
शटरिंग प्रक्रिया का आपको पालन करने की आवश्यकता है:
- हमेशा अच्छी गुणवत्ता वाली शटरिंग सामग्री का उपयोग करें।
- इसकी मोटाई 3 इंच होनी चाहिए.
- कंक्रीट डालने से पहले शटरिंग पर तेल या ग्रीस लगाना याद रखें।
- हमेशा सुनिश्चित करें कि शटरिंग में कोई गैप न हो।
- कंक्रीट के पूरी तरह से सेट होने के बाद ही शटरिंग को हटाएं।
- शटरिंग को कम से कम 16 घंटे तक रखना चाहिए लेकिन इसे 24 घंटे तक रखना बेहतर है।
- शटरिंग को सावधानी से हटाया जाना चाहिए अन्यथा कंक्रीट क्षतिग्रस्त हो सकती है।
- फ़्लोरिंग को ठीक से कैसे करें
-
- पहले कंक्रीट के बिस्तर को प्लिंथ के समान स्तर पर बनाएं और फिर फर्श के काम में मोर्टार की एक परत लगाएं।
- ग्रोइंग को यह सुनिश्चित करने की सलाह दी जाती है कि फर्श ठीक से तय हो।
- पानी का सही प्रवाह प्राप्त करने के लिए, मोर्टार के ढलान की योजना बनाएं।
- सुनिश्चित करें कि टाइलों का संरेखण सही है।
- लकड़ी के मैलेट से टाइलों को टैप करें, और यदि ध्वनि सुसंगत है, तो इसका मतलब है कि टाइलें ठीक से तय की गई हैं।
- दीवारों को पेंट कैसे करें
-
- सबसे पहले, पेंट चुनते समय दीवारों के आंतरिक और बाहरी दोनों पर विचार करना याद रखें।
- दूसरे, थोक में पेंटिंग सामग्री खरीदना किफायती है।
- तीसरा, पेंट लगाने से पहले, दीवारों की जांच कर लें कि कहीं कोई दरार तो नहीं भर गई है और दीवारों को सैंडपेपर से साफ कर लें।
- एक और बात, अपने घर को पानी के रिसाव से बचाने के लिए घर की बाहरी दीवारों पर वॉटरप्रूफिंग सीमेंट आधारित पेंट का इस्तेमाल करें।
- घर के अंदर की दीवारों पर धोने योग्य पेंट का उपयोग, दीवारों की सुंदरता को बनाए रखने में मदद करता है और बार-बार पेंटिंग की लागत को भी बचाता है।
- क्या आप घर बनाने के लिए आर्थिक रूप से तैयार हैं?
-
नए गृह निर्माण के लिए वित्त की योजना बनाते समय पालन करने के लिए कुछ कदम:
- बजट बनाना - आपकी बचत और खर्चों का स्पष्ट अनुमान होना महत्वपूर्ण है।
- हर घर की प्लानिंग बजट के हिसाब से होनी चाहिए।
- घर के निर्माण के प्रत्येक चरण में कितने पैसे की आवश्यकता होती है, इसका अंदाजा होना जरूरी है।
- बचत पर विशेष ध्यान दें, इससे आपका घर-निर्माण का सफर सुगम हो जाएगा।
- अपनी आवश्यकताओं के अनुरूप सही होम लोन चुनें।
- अपने सभी दस्तावेजों की दोबारा जांच करना न भूलें।
- अपने घर की प्लंबिंग की योजना बनाएं
-
- बिना प्लानिंग के प्लंबिंग करना भविष्य में परेशानी का कारण बन सकता है।
- प्रवेश द्वार ऊंचाई पर होना चाहिए, अन्यथा यह जल निकासी व्यवस्था में समस्या पैदा करेगा और पानी के प्रवाह को बाधित करेगा।
- हमेशा किसी असली डीलर से ही आईएसआई मार्क वाली सामग्री खरीदें।
- और आवश्यक पानी के प्रवाह के अनुसार अपने पाइप चुनें।
- पीने के पानी की आपूर्ति करने वाले पाइप जंग प्रतिरोधी होने चाहिए और उनमें एक फिल्टर होना चाहिए।
- पाइपलाइन स्थापित करते समय, किसी भी रिसाव के लिए जोड़ों की जांच करें।
- रिसाव के कारण पानी कंक्रीट की संरचना और दीवार में प्रवेश कर सकता है।
- पानी की आपूर्ति और ड्रेनेज लाइन को एक साथ न बिछाएं।
- निर्माण के लिए सही पानी का चयन
-
- निर्माण के दौरान स्वच्छ पोर्टेबल पानी का उपयोग करना महत्वपूर्ण है।
- यह पानी बोरवेल की मदद से भूजल जैसे कई स्रोतों से प्राप्त किया जा सकता है, इसे छानकर एक बड़े टैंक में जमा किया जा सकता है।
- आप नगर पालिका द्वारा आपूर्ति किए गए पानी का भी उपयोग कर सकते हैं।
- इनकी अनुपस्थिति में आपको पानी की टंकियों से पानी मिल सकता है।
- ड्रम मिक्सर में कंक्रीट कैसे मिलाएं?
-
कंक्रीट को हाथ से हाथ से मिलाने की तुलना में ड्रम मिक्सर में कंक्रीट मिलाना कहीं बेहतर है। यह कम समय में अधिक ठोस बनाता है।
- ऐसा ड्रम मिक्सर चुनें जिसमें कंक्रीट को मिलाने की पर्याप्त क्षमता हो।
- सुनिश्चित करें कि आप ड्रम मिक्सर को अंदर से साफ करें।
- किसी भी पिछले काम की गंदगी की जांच करें और अंदर से सीमेंट के घोल की एक परत लगाएं।
- ड्रम मिक्सर के ब्लेड की जांच करके सुनिश्चित करें कि वे क्षतिग्रस्त नहीं हैं।
- कंक्रीट मिक्सर में सामग्री की सही मात्रा और अनुपात डालें।
- मिश्रण को कम से कम 2 मिनट तक मिक्स करें।
- मिश्रण में ज्यादा पानी न डालें.
- कंक्रीट संघनन कैसे करें?
-
- कॉम्पेक्टिंग कंक्रीट के अंदर से हवा के बुलबुले को हटाता है जिससे कंक्रीट घना हो जाता है जिससे इसकी ताकत और स्थायित्व बढ़ जाता है।
- छोटे कंक्रीट कार्यों के लिए मैनुअल कॉम्पैक्टिंग आदर्श है; आप रॉडिंग के लिए स्टील की छड़ या टैंपिंग के लिए लकड़ी के क्रॉस बीम का उपयोग कर सकते हैं।
- यांत्रिक संघनन वाइब्रेटर की सहायता से किया जाता है जिसके परिणामस्वरूप कंक्रीट का अधिक प्रभावी संघनन होता है।
- स्लैब और सपाट सतहों के लिए सतह का संघनन किया जाता है। नीडल वाइब्रेटर आमतौर पर फुटिंग, बीम और कॉलम जैसी संरचनाओं के लिए उपयोग किए जाते हैं।
- सुई वाइब्रेटर का उपयोग करते समय सुनिश्चित करें कि सुई सीधी है और सुई सुदृढीकरण और ढांचे की प्लेटों को नहीं छूना चाहिए।
- सुई को एक ही जगह पर 15 सेकेंड से ज्यादा न हिलाएं और सुई को धीरे-धीरे हटा दें।
- सुनिश्चित करें कि वाइब्रेटर का शाफ्ट पाइप बहुत अधिक झुकता नहीं है या पाइप टूट सकता है और काम के बाद शाफ्ट पाइप और सुई को साफ करना याद रखें।
- मैनुअल कंक्रीट मिक्सिंग | कंक्रीट को हाथ से कैसे मिलाएं?
-
- जब कम मात्रा में कंक्रीट की आवश्यकता हो तो इसे हाथों से भी मिलाया जा सकता है।
- आपको इसे ऐसी सतह पर मिलाना सुनिश्चित करना चाहिए जिसमें पानी का रिसाव न हो।
- सबसे पहले सीमेंट और रेत को एक ही रंग के होने तक मिलाना चाहिए।
- फिर इस मिश्रण को समुच्चय पर डालें और कुदाल की सहायता से मिला लें।
- मिश्रण के बीच में एक छोटा गड्ढा खोदकर उसमें पानी डालें और बाहर से अंदर की तरफ मिलाना शुरू करें.
- कंक्रीट को तब तक मिलाते रहें जब तक कि यह आपकी जरूरत की स्थिरता तक न पहुंच जाए।
- कंक्रीट को हाथों से मिलाते समय 10% अधिक सीमेंट का उपयोग किया जाता है।
- याद रखें, मिश्रण बनने के तुरंत बाद इसका उपयोग करना महत्वपूर्ण है अन्यथा कंक्रीट सेट हो सकता है।
- अपने घर के लिए सही टाइलों का चयन कैसे करें?
-
फ़्लोरिंग आपके घर के रंग-रूप में महत्वपूर्ण भूमिका निभाता है। दीवार और फर्श की टाइलें चुनते समय याद रखने के लिए ये कुछ सुझाव हैं:
- आप फर्श के लिए विट्रिफाइड टाइल्स का उपयोग कर सकते हैं। वे अधिक टिकाऊ होते हैं।
- आप अपनी दीवारों के लिए सिरेमिक या चीनी मिट्टी के बरतन टाइल का उपयोग कर सकते हैं।
- ये आसानी से गंदे नहीं होते हैं।
- किचन की टाइलें खरोंच और दाग प्रूफ होनी चाहिए।
- बाथरूम की टाइलें स्किड प्रूफ होनी चाहिए, जिसका अर्थ है कि वे फिसलन वाली नहीं होनी चाहिए।
- फर्श के लिए आप संगमरमर या ग्रेनाइट स्लैब का भी उपयोग कर सकते हैं।
- दीवार फिनिशिंग के विभिन्न प्रकार क्या हैं?
-
- दीवार की फिनिशिंग दीवारों के सौंदर्यशास्त्र और घर के समग्र रूप को जोड़ती है।
- आप अपनी जरूरत के हिसाब से दीवार पर तरह-तरह की फिनिशिंग कर सकते हैं।
- तत्काल सीमेंट प्लास्टर फिनिश के लिए जहां सीमेंट के मोर्टार में दीवारों पर रेत और पानी का गड्ढा होता है।
- यह दीवारों को एक चिकनी मैट फ़िनिश देता है
- अगर आप इस मिश्रण से ज्यादा डेकोरेटिव लुक चाहते हैं तो आप सीमेंट टेक्सचर्ड फिनिश चुन सकते हैं।
- प्लास्टर ऑफ पेरिस फिनिश-पीओपी की मदद से आप अपनी दीवारों पर जटिल डिजाइन फिनिश प्राप्त कर सकते हैं।
- वुड टाइल फिनिश- यह आपको फिनिश जैसा वुड पैनल देता है।
- मिट्टी की ईंट अंतर कंक्रीट ब्लॉक
-
कंक्रीट ब्लॉकों के लाभ -
- उनके बड़े आकार के कारण, कम जोड़ सामग्री का उपयोग किया जाता है और कंक्रीट ब्लॉक के लिए उनके सटीक आकारहीन पलस्तर की आवश्यकता होती है।
- एक कंक्रीट ब्लॉक ईंट की तुलना में कम पानी अवशोषित करता है इसलिए दीवारों में नमी का स्तर भी तुलना में कम होता है।
- कंक्रीट ब्लॉक ईंटों की तुलना में अधिक किफायती होते हैं।
- अंत में, मिट्टी की ईंटों को बनाने के लिए उपजाऊ मिट्टी और लकड़ी को जलाने की आवश्यकता होती है जबकि दूसरी ओर कंक्रीट ब्लॉक बनाना अधिक पर्यावरण के अनुकूल होता है।
- यही कारण है कि मिट्टी की ईंटों की तुलना में कंक्रीट ब्लॉक बेहतर विकल्प हैं।
- संक्षेप में, कंक्रीट ब्लॉक मजबूत, पर्यावरण के अनुकूल और किफायती हैं।
- मिट्टी की ईंटें अंतर एएसी ब्लॉक
-
एएसी ब्लॉक की विभिन्न विशेषताएं:
- एएसी ईंटें मिट्टी की ईंटों की तुलना में हल्की और अधिक कुशल होती हैं।
- एएसी ब्लॉक न केवल किफायती हैं बल्कि पर्यावरण के लिए भी अच्छे हैं।
- एएसी ब्लॉक के अंदर लाखों छोटे हवाई बुलबुले होते हैं जो उन्हें हल्का बनाते हैं लेकिन सही प्रक्रिया से इसे मिट्टी की ईंटों से भी मजबूत बनाया जाता है।
- एएसी ब्लॉक बाहरी शोर और गर्मी को कम करते हैं, जिससे आपका घर शोर-मुक्त होने के साथ-साथ गर्मियों में ठंडा और सर्दियों में गर्म हो जाता है।
- अंत में, भूकंप का एएसी ब्लॉकों से निर्मित भवनों पर कम प्रभाव पड़ता है और आग फैलने का जोखिम भी कम होता है।
- प्लिंथ बीम का सही तरीके से निर्माण कैसे करें?
-
- सामान्यतया प्लिंथ बीम के निर्माण में न्यूनतम एम20 ग्रेड के कंक्रीट का उपयोग किया जाता है।
- बीम की गहराई कम से कम 200 मिमी होनी चाहिए और बीम की ऊपरी सतह जमीन की तुलना में अधिक होनी चाहिए।
- कंक्रीट डालने से पहले, शटरिंग की स्थिति को मजबूती से तय किया जाना चाहिए।
- स्टील की छड़ों को 25 मिमी का कवर दिया जाना चाहिए और कंक्रीट की उचित कॉम्पैक्टिंग की जानी चाहिए।
- हमेशा याद रखें कि बीम का उचित इलाज भी बहुत महत्वपूर्ण है।
- अपने घर की खिड़कियों और दरवाजों के फ्रेम्स को कैसे स्थिर करना ?
-
- अपने घर की खिड़कियों और दरवाजों के फ्रेम को सही तरीके से लगाना जरूरी है।
- तो आइए जानें दरवाजे और खिड़की के फ्रेम को ठीक करने के बारे में कुछ बातें।
- आमतौर पर दरवाजों और खिड़कियों के ज्यादातर फ्रेम लकड़ी के बने होते हैं।
- लेकिन आप धातु, पीवीसी या कंक्रीट जैसी सामग्री का भी उपयोग कर सकते हैं।
- दीवार का निर्माण करते समय फ्रेम को उनके निर्धारित स्थान पर लगाया जाता है और संरेखण को नियंत्रण में रखने के लिए प्लंब बॉब का उपयोग किया जाता है।
- फ्रेम और दीवारों की स्थिति को होल्डफास्ट की मदद से तय किया जाता है जो कि z आकार का होता है।
- आमतौर पर, तीन होल्डफास्ट दरवाजे के लिए और दो खिड़कियों के लिए उपयोग किए जाते हैं जो बाद में कंक्रीट से भर जाते हैं।
- निचले और साइड गैप को भी कंक्रीट से भरें।
- अपने घर को पानी के रिसाव से कैसे बचाएं? डैम्प प्रूफिंग I
-
- ऐसा होने से रोकने के लिए डैम्प प्रूफिंग एक प्रभावी तरीका है।
- यह कंक्रीट के मिश्रण और क्रेते प्रो जैसे वॉटरप्रूफिंग एजेंट की एक परत है जिसे दीवारों के निर्माण से पहले नींव पर लगाया जाता है।
- यह परत 75mm या 3 इंच चौड़ी होती है।
- यह नमी को ऊपर की ओर रिसने से रोकता है।
- डैम्प प्रूफिंग कोर्स हमेशा पानी की पहुंच से बाहर होना चाहिए जो जमीन से छींटे मार सकता है और यह जमीन से उच्चतम स्तर से 30 सेमी ऊपर होना चाहिए।
- ट्रैपेज़ॉइडल आरसीसी फ़ुटिंग स्थापित करने का सही तरीका आरसीसी फुटिंग्स के बारे में कुछ महत्वपूर्ण बातें।
-
- संरचना की आवश्यकता के अनुसार फ़ुटिंग ट्रेपोज़ाइडल, ब्लॉक या स्टेप-आकार का हो सकता है।
- फुटिंग बनाने से पहले, हमेशा खुदाई की गई जमीन को खोदें और इसे 150 मिमी मोटी कंक्रीट बेड से ढक दें।
- यह आपको अपने पैरों के लिए एक सादा मैदान देगा, फिर अपने सुदृढीकरण पिंजरे को सही संरेखण के साथ और सही जगह पर ठीक करें।
- सीमेंट की क्यारी पर सीमेंट के घोल की परत लगाने के बाद उस पर कंक्रीट डालें।
- नींव के आकार के अनुसार कंक्रीट का प्रयोग करें और उसी के अनुसार शटरिंग का प्रयोग करें।
- हमेशा सुनिश्चित करें कि नींव का आकार संरचनात्मक ड्राइंग के समान है।
- इलाज करना न भूलें।
- फ़ुटिंग सेट हो जाने पर इलाज अनिवार्य है।
- कंक्रीट को चिकना करने और एक समान सतह पाने के लिए कंक्रीट फिनिशिंग का सही तरीका
-
कंक्रीट परिष्करण के लिए ये कुछ सुझाव हैं:
- कंक्रीट फिनिशिंग कंक्रीट को एक चिकनी और समान सतह देती है।
- काँक्रिटीकरण करने के बाद कंक्रीट की फिनिशिंग की जानी चाहिए।
- गीली कंक्रीट की सतह पर सूखी सीमेंट का छिड़काव नहीं करना चाहिए।
- कंक्रीट की फिनिशिंग कंक्रीट की स्क्रीनिंग, फ्लोटिंग और ट्रॉवेलिंग द्वारा की जाती है।
- प्लास्टर की समस्याएं और उनका समाधान
-
- अत्यधिक ट्रॉवेलिंग, रेत में भट्ठा का उच्च अनुपात और अपर्याप्त इलाज से प्लास्टर की ऊपरी परत पर क्रेजिंग दरारें हो सकती हैं।
- इससे बचने के लिए आपको अच्छी क्वालिटी की रेत का इस्तेमाल करना चाहिए।
- 10 दिनों के लिए पर्याप्त इलाज करें और परिष्करण के लिए सतह पर कभी भी सीमेंट का छिड़काव न करें।
- कभी-कभी प्लास्टर पर लेप की एक सफेद परत बन जाती है जिसे इफ्लोरेसेंस के रूप में जाना जाता है और यह पानी, ईंटों और रेत में मौजूद चूने जैसी अशुद्धियों के उच्च अनुपात के कारण होता है।
- इसे ठीक करने के लिए सूखे ब्रश से उस जगह को साफ करें।
- इस पर तनु अम्ल के घोल की एक परत लगाएँ और इसे सूखने के लिए रख दें।
- होम लेआउट मार्किंग
-
- निर्माण शुरू होने से पहले होम लेआउट मार्किंग पहला कदम है।
- लेआउट इंगित करता है कि आपके प्लॉट पर एक संरचना कहाँ रखी जानी चाहिए।
- अगर ध्यान नहीं दिया तो आपका घर योजना से अलग हो सकता है|
- इंजीनियरों की मदद से अपने घर की सीमाएं तय करें|
- खुदाई शुरू होने से पहले मिट्टी की जांच करा लें।
- मिट्टी को ढीला करें, स्तंभ को गहरा करें
- दीवारों में पाइपिंग को छुपाने का सही तरीका
-
अपने घर की दीवारों में पाइपिंग छुपाने का सही तरीका
- सबसे पहले, स्पिरिट लेवल की मदद से दीवार पर नल, शॉवर हेड, वॉशबेसिन और उनके पाइप ट्रैक जैसे आउटलेट को चिह्नित करें।
- डिस्क ब्लेड की मदद से चिह्नित क्षेत्र को काटें और सुनिश्चित करें कि कट पाइप के आकार से 4-6 मिमी अधिक है
- प्रक्रिया में किसी भी बीम या कॉलम को न काटें
- फावड़े से लाइनों के बीच के हिस्से को खोदकर खांचे बनाएं और कीलों की मदद से पाइपों को खांचे में फिट करें
- दीवार और पाइप के बीच मोर्टार और सीमेंट लगाएं
- दरारों से बचने के लिए खांचे पर कील और मोर्टार की मदद से स्टील की जाली का इस्तेमाल करें।
- टाइल फिक्सो के साथ फर्श की टाइलें फिक्सिंग | टाइल फिटिंग
-
टाइल फिक्सो के साथ फर्श की टाइलें ठीक करने का सही तरीका:
- टाइल्स और सतह के बीच बेहतर बॉन्डिंग के लिए अल्ट्राटेक टाइल फिक्सो का उपयोग करें
- सतह पर 3-6mm मिश्रण के लिए एक मोटी परत लगाएं। एक मजबूत बंधन के लिए, टाइल्स को ठीक करने के लिए 30 मिनट के भीतर मिश्रण का उपयोग करें
- दीवार की टाइलें लगाते समय, नीचे से शुरू करें और ऊपर की ओर बढ़ें। सुनिश्चित करें कि दीवार और टाइलों के बीच कोई खोखला अंतराल न हो
- आप टाइल फिक्सो अल्ट्राटेक के साथ सिरेमिक, संगमरमर और ग्रेनाइट टाइलें भी ठीक कर सकते हैं
- टाइल फिक्सो एक बहुलक संशोधित सीमेंट आधारित उच्च प्रदर्शन, उच्च शक्ति, टाइलों को ठीक करने के लिए विकसित उच्च गुणवत्ता वाला टाइल चिपकने वाला, दीवारों और फर्श पर प्राकृतिक पत्थर है।
- दोनों आंतरिक और बाहरी, पतले बिस्तर अनुप्रयोगों के लिए उपयुक्त।
- विभिन्न अनुप्रयोगों के लिए टाइल फिक्सो के चार प्रकार हैं।
- अपने घर को भूकंप प्रतिरोधी कैसे बनाएं?अपने घर को भूकंप प्रतिरोधी कैसे बनाएं?
-
आपके घर को भूकंप प्रतिरोधी बनाने के लिए यहां कुछ उपाय दिए गए हैं।
- एक संरचनात्मक इंजीनियर की नियुक्ति करें, वह उपयोगकर्ताओं की सुरक्षा और आराम सुनिश्चित करने के लिए संरचनात्मक घटकों और संरचनात्मक प्रणालियों पर शोध करेगा।
- वह आपके क्षेत्र में भूकंप की संभावना और तीव्रता की भी जांच करेगा।
- उसके आधार पर इंजीनियर निर्माण के लिए सही योजना और प्रक्रिया का सुझाव देगा
- यदि घर की संरचना असमान हो तो भूकंप के दौरान नुकसान की संभावना और भी अधिक हो जाती है।
- अपने घर के कोनों में कोई खिड़की या दरवाजे न लगाएं
- बाहरी दीवार में घर के दरवाजों और खिड़कियों के ऊपर एक सतत लिंटेल बीम होनी चाहिए
- स्लैब के स्तर पर भी एक सतत बीम होना चाहिए।
- हरित गृह निर्माण योजना
-
पर्यावरण के अनुकूल हरित गृह के निर्माण की योजना बनाने में आपकी मदद करने के लिए नीचे कुछ सुझाव दिए गए हैं:
- एक ग्रीन होम हीटर, बैटरी और कुकर जैसे उपकरणों का उपयोग करता है जो सौर ऊर्जा से चलते हैं
- अगर आप अपने घर में वेंटिलेशन पर ध्यान दें तो आप अपने बिजली बिल में काफी बचत कर सकते हैं
- वर्षा जल संचयन से भूजल स्तर को बढ़ाने में भी मदद मिल सकती है
- छत पर एक बगीचा इसे हरा-भरा बनाने में मदद कर सकता है
- नींव की सही तरीके से खुदाई कैसे करें?
-
अपने घर की दीवारों में पाइपिंग छुपाने का सही तरीका
- घर की नींव रखने से पहले भूखंड की खुदाई की जाती है।
- फाउंडेशन आपके घर की संरचना का वजन नींव के नीचे की मजबूत मिट्टी में स्थानांतरित करता है।
- यदि उत्खनन कार्य सही तरीके से नहीं किया गया तो रखी गई नींव पर्याप्त मजबूत नहीं है जिससे दीवारों और खंभों में दरारें आ सकती हैं।
- खुदाई शुरू होने से पहले यह जांचना जरूरी है कि भूखंड पर नींव का सही लेआउट चिह्नित है या नहीं।
- जाँच करें कि खुदाई के गड्ढों का आकार, पैटर्न, गहराई और ढलान सम है।
- फिर खुदाई वाली क्यारियों पर पानी डालें और हथौड़ों से उसे ठोकना शुरू करें।
- अतिरिक्त खुदाई वाले क्षेत्रों को प्लम कंक्रीट से भरें।
- हमेशा याद रखें कि कोई खोखली जगह या मुलायम धब्बे नहीं होने चाहिए।
- गहरी खुदाई के दौरान, किनारों को लकड़ी के ढांचे से सहारा दें ताकि वह गिरे नहीं।
- 2-3 मंजिला इमारत के लिए खुदाई की गहराई लगभग 1.5-2 मीटर होनी चाहिए।
- यह मिट्टी की गुणवत्ता और मजबूती पर भी निर्भर करता है।
- अपना घर बनाते समय खुदाई करने का यह सही तरीका है।
- उत्खनन की क्यारियां उस पर पानी डालने के बाद घेरा जाना चाहिए यदि खुदाई गहरी है तो उसे लकड़ी के तख्तों से सहारा दें अतिरिक्त खुदाई वाले क्षेत्र को प्लम कंक्रीट से भरें।
- सिकुड़न दरार से कैसे बचें?
-
सिकुड़न दरारों से बचने और अपने घर को उनसे बचाने के तरीके:
- कंक्रीट डालने से पहले शटरिंग को हमेशा नम करें और शटरिंग के सूखने पर कंक्रीट न डालें
- कंक्रीट डालने का काम सुबह या शाम को करना चाहिए
- कंक्रीट को रखते और स्थापित करते समय, इसे तिरपाल की मदद से हवा और तेज धूप से बचाएं
- कंक्रीट में नमी को सूखने न दें। समय-समय पर इलाज करते रहना चाहिए।
- कंक्रीट के साथ कितना पानी मिलाना है?
-
एक ठोस सीढ़ी बनाने के लिए 6 कदम:
- पानी सीमेंट को मजबूत बनाने के लिए रासायनिक रूप से प्रतिक्रिया करता है।
- आम तौर पर पीने के पानी का इस्तेमाल कंक्रीट मिलाते समय किया जाता है।
- कंक्रीट मिलाते समय खारे पानी का उपयोग करने से बचें क्योंकि इससे आरसीसी स्टील रॉड में जंग लग सकता है।
- याद रखें कि अपने कंक्रीट मिश्रण में अतिरिक्त पानी मिलाने से कंक्रीट की मजबूती और टिकाऊपन कम हो सकता है।
- अतिरिक्त पानी के कारण कंक्रीट में दरारें पड़ सकती हैं।
- हमेशा याद रखें कि सिंगल अल्ट्राटेक सीमेंट बैग में आमतौर पर 20 से 27 लीटर पानी खर्च होता है।
- स्टेप बाय स्टेप होम कंस्ट्रक्शन गाइड
-
घर के निर्माण में शामिल कदम हैं:
- अपने घर का प्लान बनाने के बाद किसी सरकारी कार्यालय से प्लॉट की सही मार्किंग करवाएं और सर्वेयर से अपने प्लॉट का सर्वे करवाएं।
- पूरे भूखंड को साफ करें और एक वास्तुकार द्वारा चिह्नित लेआउट प्राप्त करें जिसके बाद आप खुदाई शुरू कर सकते हैं।
- खुदाई के बाद आप नींव रखना शुरू कर सकते हैं।
- अपने घर की दीवार को मजबूत करने के लिए नींव पर प्लिंथ बीम का निर्माण करें।
- यदि आप प्लिंथ का निर्माण नहीं कर रहे हैं तो अपने घर को वाटरप्रूफ करने के लिए एक नम प्रूफ कोर्स करना चाहिए।
- अब आप दीवारों का निर्माण शुरू कर सकते हैं।
- दरवाजों और खिड़कियों पर भारी भार से बचने के लिए दीवारों पर लिंटेल बीम का निर्माण करें।
- फिर छत और स्लैब का काम शुरू करें।
- अब संरचना की पलस्तर और इलाज करें।
- फिर अपने घर के फर्श और टाइलिंग से शुरू करें, उसके बाद लाइट फिटिंग, प्लंबिंग, फिक्सिंग दरवाजे और खिड़कियां।
- अंत में अपने घर की पेंटिंग का काम शुरू करें।
- केवल 6 सरल चरणों में कंक्रीट की सीढ़ी कैसे बनाएं?
-
- सीढ़ी डिजाइन करने के लिए एक इंजीनियर से मिलें।
- नींव का काम हो जाने के बाद शटरिंग को डिजाइन के अनुसार लगाएं।
- फिर ड्राइंग के अनुसार स्टील की सड़कें लगाएं।
- कंक्रीटिंग का काम हो जाने के बाद कंक्रीट को सूखने दें।
- संरचना का उचित इलाज और परिष्करण किया जाना चाहिए।
- अपने घर के वेंटिलेशन की योजना कैसे बनाएं?
-
- अपने घर के वेंटिलेशन सिस्टम की योजना बनाना आपके घर के लिए महत्वपूर्ण है क्योंकि यह नमी को नियंत्रण में रखने में मदद करता है और फंगस को फैलने से रोकता है जो घर को गंध मुक्त रखता है और घर के सदस्य अच्छे स्वास्थ्य में रहते हैं।
- घर की खिड़कियों को सही दिशा में रखने से घर के वायु प्रवाह में सुधार हो सकता है
- बेहतर वेंटिलेशन के लिए बाथरूम में किचन चिमनी और एग्जॉस्ट फैन जैसे घरेलू वेंटिलेशन सिस्टम का इस्तेमाल करें
- निर्मित रेत (एम-रेत) या कुचल पत्थर की रेत का उपयोग करने के लाभ
-
आपके घर के निर्माण में नदी की रेत की तुलना में निर्मित रेत (एम रेत) या कुचल पत्थर की रेत एक बेहतर विकल्प है नीचे निर्मित रेत (एम रेत) का उपयोग करने के लाभ हैं:
- निर्मित रेत साफ होती है क्योंकि इसमें मिट्टी, गंदगी और अन्य अशुद्धियाँ नहीं होती हैं
- निर्मित रेत के अच्छे ग्रेडेशन के कारण इसके द्वारा बनाए गए कंक्रीट की ताकत बढ़ जाती है
- निर्मित रेत का उपयोग करके बने कंक्रीट में अलगाव, शहद-कंघी या केशिका जैसी समस्याएं नहीं होती हैं जो इसकी स्थायित्व और ताकत को बढ़ाती हैं
- निर्मित रेत या कुचल पत्थर की रेत नदी की रेत की तुलना में एक किफायती और बेहतर विकल्प है
- यह पर्यावरण के लिए भी अच्छा है।
- निर्माण की सामान्य शर्तें क्या हैं?
-
निर्माण की सामान्य शर्तें:
- नींव - एक घर की नींव इमारत के पूरे भार को जमीन पर स्थानांतरित कर देती है, इसलिए यह अनुशंसा की जाती है कि आप अपने घर की नींव की गहराई और चौड़ाई तय करने से पहले एक इंजीनियर से परामर्श लें।
- प्लिंथ बीम - एक प्लिंथ नींव और दीवार के बीच एक मजबूत समर्थन के रूप में कार्य करता है। यह एक आरसीसी बीम है जो नींव को पूरे घर के भार को जमीन पर स्थानांतरित करने में मदद करती है।
- फ़ुटिंग - एक फ़ुटिंग कॉलम लोड को एक बड़े क्षेत्र में वितरित करता है जो संरचना की भार वहन क्षमता में सुधार करता है।
- कॉलम और बीम - बीम स्लैब से लोड को कॉलम में ट्रांसफर करते हैं और कॉलम पूरे लोड को फाउंडेशन में ट्रांसफर करते हैं।
- ये सभी संरचनाएं अपने तरीके से घर को मजबूती प्रदान करती हैं इसलिए इनका निर्माण करते समय सावधानी बरतनी चाहिए।
- मोटे समुच्चय
-
अपने घर के निर्माण के लिए सही मोटे समुच्चय का चयन करने के लिए:
- गलत मोटे समुच्चय का उपयोग करने से आपके घर की मजबूती प्रभावित हो सकती है।
- सुनिश्चित करें कि कुल मिलाकर रेत और धूल की मात्रा कम है।
- कठोर और कम चमकदार समुच्चय सीमेंट के साथ एक मजबूत बंधन बनाते हैं।
- ऐसे समुच्चय जो बहुत अधिक पानी सोखते हैं, कंक्रीट बनाने के लिए अच्छे नहीं होते हैं।
- अलग-अलग आकार के समुच्चय को अलग-अलग रखने से कंक्रीट को मिलाना आसान हो जाता है।
- अपने घर को कैसे इंसुलेट करें?
-
एक घर में चार मुख्य प्रकार के इन्सुलेशन होते हैं।
- सबसे पहले, खिड़की इन्सुलेशन - बाहर से ठंड मुख्य रूप से खिड़कियों और दरवाजों से घर में प्रवेश करती है। इसे रोकने के लिए, आप इसमें रबर गैसकेट के साथ डबल ग्लास खिड़कियां स्थापित कर सकते हैं।
- दूसरा, फर्श इन्सुलेशन - लकड़ी के फर्श / टुकड़े टुकड़े फर्श / कॉर्क-आधारित फर्श की एक परत स्थापित करके आप अपने घर को ठंड से जमीन में प्रवेश करने से रोक सकते हैं।
- तीसरा, दीवारों और छत की स्थापना - इसे बनाते समय दीवारों में हवा की जेब बनाता है या एसीसी ब्लॉकों को निर्माण सामग्री के रूप में उपयोग करता है जो कठोर धूप से इन्सुलेशन प्रदान करेगा। दीवारों पर हल्का रंग लगाएं, खासकर अपने घर की पश्चिमी दीवार पर जो धूप से निकलने वाली गर्मी का विरोध करेगी। छत के स्लैब पर चाइना मोज़ेक, हल्के रंग की या मिट्टी की टाइलों का प्रयोग करें।
- ध्वनि से चौथा इन्सुलेशन - एएसी ब्लॉक से बनी दीवार बाहरी ध्वनि को अवशोषित कर सकती है। आप दीवारों की आंतरिक सतह को टुकड़े टुकड़े भी कर सकते हैं। डबल ग्लास विंडो बाहरी ध्वनियों का भी विरोध कर सकती है। ये कुछ तरीके थे जिनसे आप अपने घर को इंसुलेट कर सकते हैं।
- निर्माण स्थल सुरक्षा नियम और राजमिस्त्री के लिए सुझाव |कोविद -19I से बचाव
-
कुछ महत्वपूर्ण स्वास्थ्य और सुरक्षा नियम और सुझाव जिनका निर्माण स्थल पर पालन किया जाना चाहिए।
- अपने ठेकेदार से बात करें, श्रमिकों और राजमिस्त्री के स्वास्थ्य और सुरक्षा के बारे में नियमित रूप से सभी को सुरक्षा दिशानिर्देशों के बारे में विस्तार से सूचित करें।
- केवल अच्छे स्वास्थ्य वाले श्रमिकों को ही काम करने दें।
- निर्माण स्थल पर बाहरी लोगों को अनुमति न दें।
- नियमित रूप से थर्मल जांच करें और सुनिश्चित करें कि काम शुरू करने से पहले कार्यकर्ता अपने हाथों को साफ कर लें।
- कामगारों को हर दो घंटे में अपने हाथों को लिक्विड वॉश या साबुन से धोना चाहिए।
- निर्माण स्थल पर सभी को हेलमेट, दस्ताने और मास्क पहनना होगा।
- हर समय सोशल डिस्टेंसिंग प्रोटोकॉल का पालन करें और कम से कम 6 फीट की दूरी बनाए रखें।
- कंस्ट्रक्शन साइट पर किसी से हाथ मिलाने से बचें।
- भोजन के सेवन के लिए एक निश्चित स्थान आवंटित करें और सुनिश्चित करें कि भोजन करते समय सामाजिक दूरी का पालन किया जा रहा है।
- तंबाकू, गुटका, पान और थूकने की अनुमति न दें।
- जिस किसी को भी खांसी, जुकाम या नाक बहने के लक्षण हों, उन्हें साइट पर काम न करने दें और डॉक्टर से सलाह लेने के लिए कहें।
- काम के बाद अपने परिवार के सदस्यों से मिलने से पहले श्रमिकों को स्वच्छता के महत्व पर शिक्षित करें।
- सुनिश्चित करें कि निर्माण स्थल पर अस्पतालों और आपातकालीन संपर्कों की सूची उपलब्ध है। ये कुछ महत्वपूर्ण स्वास्थ्य और सुरक्षा दिशा-निर्देश थे जिनका निर्माण स्थल पर पालन किया जाना था जब आप लॉकडाउन के बाद काम फिर से शुरू करते हैं।
- इन्सुलेशन आपके घर को बाहरी ठंड, गर्मी और ध्वनि से कैसे बचाता है?
-
- विंडो इंसुलेशन - बाहर से ठंड ज्यादातर खिड़कियों और दरवाजों के माध्यम से घर में प्रवेश करती है। इसे रोकने के लिए, आप उनमें रबर गैसकेट के साथ डबल ग्लास खिड़कियां स्थापित कर सकते हैं।
- फ्लोर इंसुलेशन - लकड़ी के फर्श / टुकड़े टुकड़े फर्श / कॉर्क-आधारित फर्श की एक परत स्थापित करके, आप अपने घर को ठंड से जमीन में प्रवेश करने से रोक सकते हैं।
- दीवारें और छत का इन्सुलेशन - इसे बनाते समय दीवारों में हवा की जेबें बनाएं या एएसी ब्लॉकों का निर्माण सामग्री के रूप में उपयोग करें जो कठोर धूप से इन्सुलेशन प्रदान करेगा। अपनी दीवारों पर हल्के रंग का पेंट लगाएं, खासकर अपने घर की पश्चिमी दीवार पर जो सूरज की गर्मी का विरोध करेगा। छत के स्लैब पर चाइना मोज़ेक, लाइट पेंट या मिट्टी की टाइलों का प्रयोग करें।
- ध्वनि से इन्सुलेशन: एएसी ब्लॉक से बनी दीवार बाहरी ध्वनि को अवशोषित कर सकती है। आप दीवारों की आंतरिक सतह को टुकड़े टुकड़े भी कर सकते हैं या उन्हें ध्वनि इन्सुलेशन पैनल के साथ कवर कर सकते हैं। डबल ग्लास खिड़कियां बाहरी ध्वनियों का भी विरोध कर सकती हैं।
- गृह निर्माण बजट योजना
-
- निर्माण से पहले घर बनाने की लागत के बारे में जानना जरूरी है।
- आइए निर्माण के चरण को उनकी समयरेखा और खर्चों के विभाजन को समझते हैं।
- विभाजन आपकी आवश्यकताओं के अनुसार बदल सकता है, नियोजन स्तर पर, गृह योजना को दस्तावेज और अनुमोदन प्राप्त करने में लगभग 2.5% की लागत आती है
- उत्खनन कार्य लगभग 3% नींव और नींव बनाने के लिए
- 12% खर्च किया जाता है
- और आरसीसी ढांचा बजट का 10% बनाता है।
- स्लैब और रूफ कॉस्ट मेकअप 13%
- ईंटवर्क और प्लास्टर की लागत 17% है बजट का 9.10% फर्श और जुताई के लिए उपयोग किया जाता है।
- 8% बिजली के काम के आदी हो जाते हैं
- नलसाजी लागत 5%
- जबकि दरवाजे और खिड़कियों की कीमत 8% है
- पेंटिंग और फिनिशिंग की लागत 6%
- और 5.5% क्रमशः
- बाढ़ प्रतिरोधी घर कैसे बनाएं
-
- यदि आपका प्लॉट बाढ़ प्रभावित क्षेत्र है तो सबसे पहले आपको कुछ आवश्यक कदम उठाने होंगे।
- अपने इंजीनियर के साथ उचित समाधान पर काम करें।
- अपने भूतल के स्तर को बाढ़ के स्तर के बारे में बढ़ाकर ऐसा करने के रास्ते पर
- सुनिश्चित करें कि आपके घर की नींव सख्त आधार पर बनाई गई है
- आपकी नींव कम से कम 2 मीटर गहरी होनी चाहिए
- अपने प्लॉट के बगल में बड़े-बड़े नाले बनाकर आप पानी के बहाव की दिशा बदल सकते हैं
- इसके अलावा, यदि आपका प्लॉट बहते पानी के स्रोत के पास है तो आपका घर बैंक से कम से कम 10 से 15 मीटर की दूरी पर होना चाहिए।
- स्टील का उपयोग सुदृढीकरण के रूप में क्यों किया जाता है?
-
- टीएमटी बार्स पर पसलियां होती हैं जो कंक्रीट और रॉड्स को एक मजबूत पकड़ बनाने और एक साथ रहने में मदद करती हैं।
- रिब्ड स्टील की छड़ें 8 मिमी मोटाई से लेकर 32 मिमी मोटाई तक बाजार में उपलब्ध हैं।
- आप इनका उपयोग स्ट्रक्चरल डिजाइन के अनुसार कर सकते हैं।
- स्लैब का निर्माण करते समय छड़ें एक जाल या जाल जैसी संरचना में बंधी होती हैं।
- खंभों और बीमों के निर्माण में छड़ों को एक पिंजरे जैसी संरचना में बनाया जाता है।
- हमेशा सुनिश्चित करें कि उन छड़ों का चयन करें जो ISI द्वारा स्वीकृत हों।
- लोहे की छड़ों को सूखे वातावरण में रखें ताकि उनमें जंग न लगे।
- ये सुदृढीकरण स्टील्स के बारे में कुछ सामान्य तथ्य थे।
- कंक्रीट की छत का निर्माण कैसे करें: चरण दर चरण मार्गदर्शिका
-
कंक्रीट की छतों का निर्माण कैसे करें, इस पर चेकलिस्ट निम्नलिखित हैं:
- छत के निर्माण के लिए शटरिंग की जाती है। यह लकड़ी या स्टील से बना होता है। इसका समर्थन करने के लिए बांस या मचान प्रॉप्स का उपयोग किया जाता है ताकि संरचना ढह न जाए;
- स्टील की सलाखों से बने जाल को किनारों पर बेंट-अप सलाखों के साथ रखा गया;
- इन स्टील की छड़ों के नीचे कवर ब्लॉक रखे गए हैं जो सलाखों को स्थिति में स्थिर रखते हैं;
- रेत, सीमेंट और समुच्चय का कंक्रीट मिश्रण डाला जाता है;
- वाटरप्रूफिंग कंपाउंड जैसे वेदर प्रो को मिक्स में मिलाया जाता है;
- कंक्रीट डालने के बाद संघनन की प्रक्रिया शुरू होती है;
- यह महत्वपूर्ण है कि कंक्रीट सही ढंग से समतल हो। कॉम्पेक्टिंग के बाद अगला कदम फिनिशिंग है। स्लैब की ऊपरी सतह पर इलाज के लिए छोटे-छोटे पाउंड बनाए जाते हैं। संरचना 2-3 सप्ताह के लिए ठीक हो जाती है। इससे आपका स्लैब मजबूत होता है।
- फिर शटरिंग हटा दें। इस तरह घर के लिए कंक्रीट की छत बनाई जाती है।
- क्या आप अपना घर बनाने की योजना बना रहे हैं?
-
- घर बनाने से पहले योजना बनाना सबसे महत्वपूर्ण कदम है।
- अपने परिवार की जरूरतों के बारे में सोचें जब आप योजना बनाना शुरू करते हैं और बजट का सही अनुमान लगाते हैं तो उनके भविष्य को ध्यान में रखें।
- अपने भूखंड के लिए एक सर्वेक्षण करें और इसकी सीमाओं को चिह्नित करें और अपने इंजीनियर द्वारा बनाई गई एक आदर्श संरचना योजना प्राप्त करें।
- अपने इंजीनियर से आधुनिक और प्रभावी निर्माण प्रथाओं को समझें और अपने निर्माण के लिए एक अनुमान तैयार करें।
- फिर पूरी तरह से जांच के बाद एक अनुभवी ठेकेदार का चयन करें और उसके साथ घर बनाने का अनुबंध करें।
- निर्माण शुरू करने से पहले सुनिश्चित करें कि आपकी सभी अनुमतियां और दस्तावेज तैयार हैं।
- बिरला व्हाइट पुट्टी क्या है?
-
कंक्रीट की छतों का निर्माण कैसे करें, इस पर चेकलिस्ट निम्नलिखित हैं:
- बिड़ला सफेद पुट्टी पानी प्रतिरोधी, सीमेंट आधारित पुट्टी है
- यह बेहतर बॉन्डिंग, कवरेज और फिनिश सुनिश्चित करता है
- यह क्रस्टिंग, शैवाल और कवक को रोकता है
- इस पोटीन को आसानी से प्लास्टर, आरसीसी और कंक्रीट की सतहों पर लगाया जा सकता है बिरला सफेद पुट्टी 2 प्रकार की होती है पीओपी के विपरीत, यह पानी को अवशोषित नहीं करता है।
- बेसमेंट का चरणबद्ध निर्माण
-
- खुदाई के बाद, समतल करने के लिए पीसीसी बेड बिछाएं और उसमें वॉटरप्रूफिंग एजेंट डालें।
- पीसीसी बिस्तर पर नींव और स्तंभों के लिए स्टील और फॉर्मवर्क को ठीक करें।
- दीवार बनाने के बाद इसे दोनों तरफ से वाटरप्रूफ करें और मिट्टी से बैकफिल करें।
- नींव के प्लिंथ स्तर के सभी स्तंभों को दोनों तरफ से बीम से कनेक्ट करें।
- जल निकासी की सावधानीपूर्वक योजना बनाएं।
- कंक्रीट का परीक्षण: कंक्रीट परीक्षण विधि
-
- कंक्रीट निर्माण के लिए सही है या नहीं, यह देखने के लिए एक व्यावहारिकता परीक्षण किया जाता है
- इस परीक्षण के लिए उपयोग की जाने वाली शंकु के आकार की मोल्ड आईडी।
- सांचे में कंक्रीट का मिश्रण भरें और इसे दो मिनट के लिए सेट होने दें।
- शंकु को ऊपर उठाने पर कंक्रीट नीचे की ओर मुड़ जाती है।
- शंकु और ढलान के स्तरों में दूरी को मापें।
- यदि कंक्रीट दृढ़ नहीं रहता है, तो इसका उपयोग नहीं किया जा सकता है।
- सफेद सीमेंट के विभिन्न उपयोग
-
- आप अपने घर के लिए वांछित रंगों को प्राप्त करने के लिए सफेद सीमेंट का उपयोग कर सकते हैं।
- यह डिजाइनर और मोज़ेक फर्श को ठीक करने के लिए आधार के रूप में कार्य करता है।
- यह टाइल्स को जोड़ने के लिए उपयुक्त सामग्री के रूप में कार्य करता है।
- सफेद सीमेंट रंगों के वास्तविक रंगों को बनाए रखता है।
- दीवारों को सफेद सीमेंट से सफेदी भी की जा सकती है।
- कंक्रीट कंप्रेसिव स्ट्रेंथ टेस्ट
-
- कंक्रीट के सख्त होने के बाद कंप्रेसिव टेस्ट किया जाता है।
- 150mm x 150mm x 150mm के क्यूब मॉड्यूल का उपयोग किया जाता है।
- कंक्रीट को सांचे में भरने के बाद कॉम्पेक्टिंग की जाती है।
- क्यूब के सख्त हो जाने पर इसे 28 दिनों तक पानी में रखा जाता है|
- क्यूब को टेस्टिंग मशीन की प्लेट्स के बीच में रखना चाहिए।
- रसोई का आकार कैसे तय करें?
-
- रसोई को 4 भागों में बांटा गया है - भंडारण, सिंक, खाना पकाने और काटने और काटने का क्षेत्र।
- यदि घर 50 वर्ग मीटर का हो तो रसोई घर का न्यूनतम क्षेत्रफल 30 वर्ग मीटर होना चाहिए।
- घर का क्षेत्रफल 50 वर्ग मीटर हो तो किचन 4.50 वर्ग मीटर हो सकता है।
- काउंटर की ऊंचाई 85 सेमी - 93 सेमी कम और विभाग 60 कम होना चाहिए।
- ओवर काउंटर कैबिनेट काउंटर से 60-70 सेमी ऊंचा होना चाहिए और विभाग किचन काउंटर का आधा होना चाहिए।
- एक सुखद घर के लिए गलियारे की योजना बनाएं
-
एक सुखद घर के लिए गलियारे की योजना बनाएं, क्योंकि यह घर के सबसे महत्वपूर्ण स्थानों में से एक है।
- गलियारा घर का एक महत्वपूर्ण हिस्सा है, क्योंकि यह घर के अन्य कमरों की ओर जाता है।
- एक सुनियोजित गलियारे को डिजाइन करने के लिए, कुछ कारकों पर विचार करना चाहिए।
- सबसे पहले कॉरिडोर की चौड़ाई करीब 3-4 फीट होनी चाहिए।
- दूसरा, कॉरिडोर को इस तरह से स्थापित किया जाना चाहिए कि यह एक अच्छी तरह से रोशनी वाले क्षेत्र में हो।
- तीसरा, कॉरिडोर करीब 10-12 फीट लंबा होना चाहिए।
- चौथा, कॉरिडोर अच्छी तरह हवादार और तापमान नियंत्रित होना चाहिए।
- पांचवां, कॉरिडोर में फर्नीचर के लिए पर्याप्त जगह होनी चाहिए।
- छठा, गलियारे में घर के अन्य कमरों से अलग करने के लिए एक दरवाजा होना चाहिए।
- सातवां, कॉरिडोर में गिरने से बचाने के लिए रेलिंग या बैनिस्टर होना चाहिए।
- अंत में, गलियारे को साफ रखने के लिए गलियारे में एक मजबूत फर्श और दीवारें होनी चाहिए।
- अपने घर के आयामों की योजना बनाना सीखें
-
- एक शयन कक्ष क्षेत्र 15 से 20 वर्ग मीटर होना चाहिए।
- एक लिविंग रूम में 25 वर्ग मीटर की जगह होनी चाहिए।
- बच्चों के कमरे के लिए 15 वर्ग मीटर का क्षेत्रफल रखें।
- किचन और डाइनिंग सेक्शन के लिए 15 वर्ग मीटर का क्षेत्रफल 10-15 वर्ग मीटर रखें।
- रसोई के लिए आवंटित किया जाना चाहिए, और भोजन क्षेत्र के लिए आराम करना चाहिए।
- बाथरूम का क्षेत्रफल 6 वर्ग मीटर होना चाहिए।
- और न्यूनतम छत की ऊंचाई 2.30 मीटर।
- गृह निर्माण अनुबंध युक्तियाँ
-
- अनुबंध दो प्रकार के होते हैं - पूर्ण अनुबंध या श्रम अनुबंध।
- अनुबंध में कार्य स्थान निर्दिष्ट करें
- प्रत्येक चरण के लिए समय सीमा निर्धारित करें।
- स्पष्ट रूप से राज्य भुगतान कार्यक्रम और बजट अनुमान।
- विवाद समाधान के लिए उपयुक्त कार्य योजना निर्दिष्ट करें।
- ठेकेदार के पिछले कार्य की जांच अवश्य करें।
- आप हमेशा अपने कानूनी विशेषज्ञ से सलाह ले सकते हैं।
- ईंट चिनाई में बड़ी गलतियाँ: ईंट चिनाई युक्तियाँ
-
- अनियमित आकार की ईंटें दीवारों की गुणवत्ता को प्रभावित करती हैं।
- गलत मिश्रण से मोर्टार की ताकत प्रभावित होती है।
- सूखी ईंटों के उपयोग से जल अवशोषण का खतरा होता है।
- बिस्तर जोड़ों का सीधा संरेखण नहीं किया जाना चाहिए।
- अपर्याप्त इलाज से दीवार की मजबूती कम हो जाती है।
- विशेषज्ञ की देखरेख में काम करना जरूरी है।
- स्टोन चिनाई की गलतियों से बचें: स्टोन चिनाई युक्तियाँ |
-
- दीवार पर बाहर और अंदर एक ही समय पर बनाना चाहिए।
- जोड़ 2.0-2.5 सेमी . से अधिक मोटा नहीं होना चाहिए
- इस बात का ध्यान रखें कि पत्थर दीवार के बाहर नजर न आए।
- सीमेंट और पानी के अनुपात को ध्यान में रखें।
- दीवारों को कम से कम 7 दिनों तक ठीक करना चाहिए।
- गौशाला का निर्माण: गौशाला निर्माण युक्तियाँ
-
- शेड की दीवारें 8 फीट ऊंची नहीं होनी चाहिए।
- नमी से सुरक्षा पाने के लिए वॉटरप्रूफिंग एजेंट का इस्तेमाल करें।
- फर्श ग्रोव्ड कंक्रीट या सीमेंट की ईंटों से बना होना चाहिए।
- चारे के लिए खांचे बनाएं और खाद के लिए चौड़ी नाली बनाएं।
- दरवाजे 7 फीट चौड़े और 5 फीट ऊंचे होने चाहिए।
- अपने घर और शेड के बीच पर्याप्त दूरी रखें।
- कुएं का निर्माण कैसे करें? कैसे एक कुआं बनाने के लिए?
-
- सबसे पहले कुआं खोदने के लिए सही जगह का चुनाव करें।
- खुदाई के बाद पत्थर और मिट्टी का अलग-अलग ढेर बना लें।
- सभी काम विशेषज्ञों की देखरेख में कराएं।
- पानी का स्रोत शुरू होने पर खुदाई बंद कर दें इसके बाद इसकी केसिंग शुरू करें।
- RCC के छल्ले घटने के जोखिम को कम कर सकते हैं।
- पानी निकालने के लिए मोटर पंप का प्रयोग करें।
- बायोगैस संयंत्र का निर्माण: बायोगैस संयंत्र निर्माण युक्तियाँ |
-
- भूमिगत डाइजेस्टर टैंक के लिए 15 सेमी मोटी नींव बनाएं।
- ईट या कंक्रीट की सहायता से टंकी का कार्य समाप्त कर डिवाइडिंग वॉल बना लें।
- डाइजेस्टर टैंक के ऊपर गुंबद के आकार की छत लगा दी और उसमें गैस का पाइप लगा दिया।
- टैंक के बगल में भूमिगत से फीडर पिट का एक इनलेट पिट बनाएं।
- दूसरी तरफ से एक आउटलेट पिट या ओवरफ्लो पिट बनाएं।
- गैस से पाइप इस्तेमाल के लिए किचन में लाएं।
- वॉटरप्रूफिंग में सामान्य गलतियों से कैसे बचें?
-
- पानी के नुकसान की उपेक्षा न करें।
- यदि मिट्टी का ढलान घर के बाहर नींव की ओर है और छत का ढलान सही नहीं है तो नमी चारों ओर फैल जाएगी।
- नमी से बचने के लिए प्लास्टर की दरारों को भरने के लिए सीलिंग पेस्ट का इस्तेमाल करना सही नहीं है।
- वाटरप्रूफिंग हमेशा विशेषज्ञ के माध्यम से की जानी चाहिए और सही वॉटरप्रूफिंग उत्पादों का ही उपयोग करना चाहिए।
- गृह निर्माण में इंजीनियरों और वास्तुकारों का महत्व
-
- गृह निर्माण में विशेष रूप से योजना और पर्यवेक्षण के दौरान अतिरंजना नहीं की जा सकती है।
- गृह निर्माण पर विचार करते समय, आपको अपना घर बनाने के लिए सही इंजीनियरों और वास्तुकारों को नियुक्त करने की आवश्यकता होती है।
- बिल्डिंग इंजीनियर सपोर्ट, लोड और बिल्डिंग मैटेरियल की देखभाल करते हैं।
- निर्माण प्रक्रिया के दौरान, वे योजनाओं की समीक्षा और मूल्यांकन के साथ-साथ संरचना और उसके आसपास का निरीक्षण करते हैं। आर्किटेक्ट मुख्य रूप से नियोजन चरण पर ध्यान केंद्रित करते हैं।
- वे एक इमारत या घर के डिजाइन पर ध्यान केंद्रित करते हैं।
- इंजीनियर - घर की ड्राइंग के साथ-साथ स्ट्रक्चर को भी मजबूत करते हैं वे विद्युत तारों और नलसाजी के लेआउट की देखरेख भी देखते हैं
- वास्तुकार - वे आपके घर के रंगरूप और ऊंचाई को डिजाइन करते हैं
- इंजीनियर और आर्किटेक्ट क्षेत्र के बिल्डिंग कोड और रेगुलेशन से परिचित हैं
- मिट्टी के प्रकार और नींव पर इसके प्रभाव: नींव के लिए अच्छी मिट्टी
-
- पीट मिट्टी नींव डालने के लिए उपयुक्त नहीं है।
- नींव रखने से मिट्टी नींव पर दबाव बनाती है।
- ढीली रेत में नींव के नीचे एक अंतर हो सकता है।
- घर की नींव रखने के लिए दानेदार मिट्टी सबसे अच्छी होती है।
- रॉकी आधारित नींव को मजबूत करता है घर बनाने से पहले मिट्टी की जांच करा लेनी चाहिए।
- विभिन्न जलवायु परिस्थितियों के आधार पर अपना घर कैसे बनाएं
-
हमारे देश के विभिन्न क्षेत्रों में जलवायु एक महत्वपूर्ण भूमिका निभाती है। आइए जलवायु और निर्माण के बारे में कुछ बातें समझते हैं:
- गर्म और शुष्क क्षेत्र में, सूरज की रोशनी घर को गर्म कर देती है।
- छत के प्लास्टर को हीट रिफ्लेक्टिव पेंट से पेंट करना।
- गर्मी अवशोषण को कम करने में आपकी सहायता कर सकते हैं।
- मुख्य द्वार का मुख उत्तर दक्षिण दिशा की ओर होना चाहिए।
- अधिक धूप से बचने के लिए।
- पश्चिम की ओर मुख करके दरवाजे और खिड़कियां बनाने से बचें।
- खोखले कंक्रीट ब्लॉक बेहतर अलगाव प्रदान करते हैं।
- जो घर के अंदर के तापमान को नियंत्रित करने में मदद करता है।
- वेंटिलेशन की योजना बनाना और वेंटिलेशन सिस्टम की सावधानीपूर्वक योजना बनाना याद रखें।
- अधिक वर्षा वाले क्षेत्रों में दरवाजे और खिड़की के ऊपर लिंटेल बीम का निर्माण करें।
- ढलान वाली छतों को डिजाइन करें ताकि पानी आसानी से धुल जाए।
- और अपने घर की संरचना को वाटरप्रूफ करना याद रखें।
- ठंडे क्षेत्र में उत्तर और पश्चिम में दरवाजे और खिड़कियां बनाएं।
- अपने घर में गर्म धूप को गीला करने के लिए।
- अच्छी इंसुलेटिंग सामग्री का उपयोग करें खिड़कियां, दरवाजे और फर्श का निर्माण करते समय।
विभिन्न जलवायु परिस्थितियों में घर बनाने के लिए ये कुछ सुझाव थे।
Contact Us

+91-8530075659

Head Office
Build Any Homes, AICD Infradecor LLP
67, Mukharji Bhavan, Opp. Kala Bhavan, Laxmi Nagar, Nagpur - 440010, Maharashtra
Follow Us